Slate by Technolutions is a comprehensive CRM platform designed for higher education bodies to manage students’ relationships, send outreach communications, and so on. If you are using Slate, you can integrate your Slate system with Comm100 to further streamline your operations by handling chats and messages in a unified manner.
Integration on the Comm100 Side
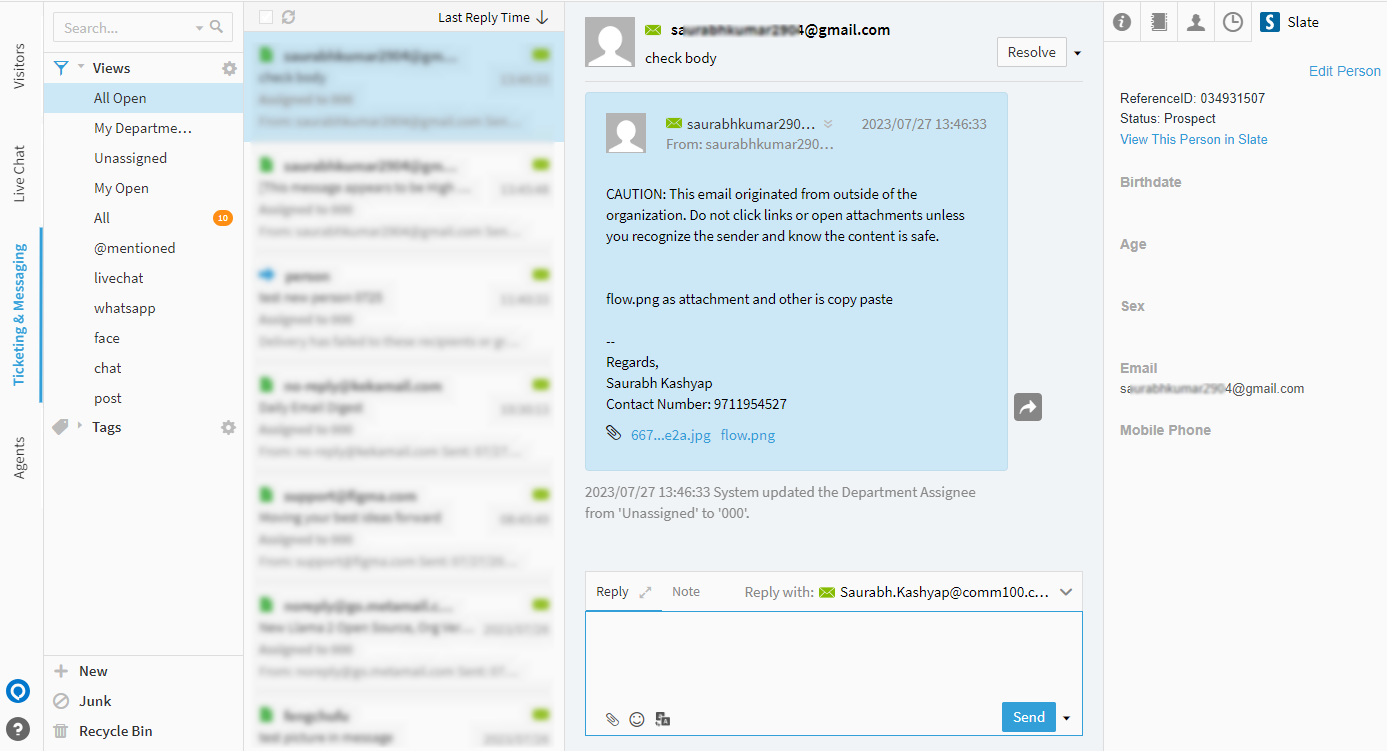
With the Comm100 and Slate integration, a Slate tab appears under the Live Chat or Ticketing & Messaging tab on the Agent Console. The Slate tab shows the Slate Person’s information, and agents can edit the Slate Person, or click the link to view the Person in Slate system. Agents’ changes can be updated to the Slate system automatically.
- There is a 15-minute time delay for the Slate system to synchronize Comm100 data, so it may take 15 minutes for agents’ changes to show in Slate.
- If a visitor from Live Chat or a contact from Ticketing & Messaging has a match in the Slate system, the Slate tab shows the Slate Person’s information. If Comm100 finds no match for the visitor or contact in the Slate system, the Slate tab is empty, and agents can create a Person manually depending on your integration settings.
Integration on the Slate Side
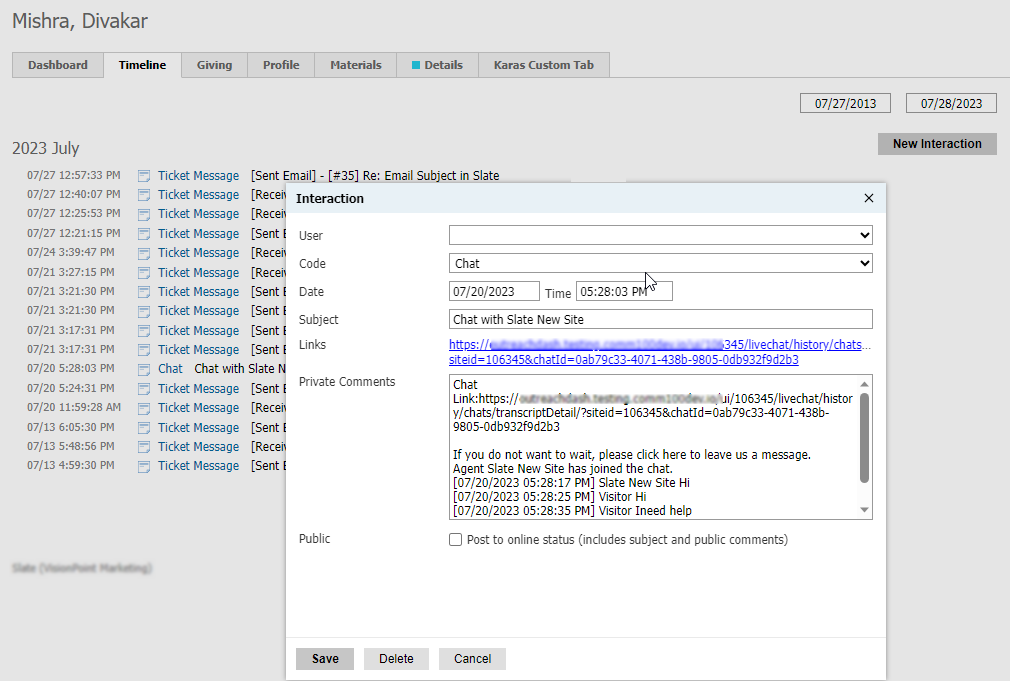
With the Comm100 and Slate integration, a Slate Person’s profile can be updated from Comm100, and the interaction history including chats, offline messages, and tickets appear in the Person’s timeline. For each interaction record, you can click to view the details.
To integrate Slate with Comm100, you need to complete the setup from both the Comm100 system and the Slate system. Follow the procedure to set up your Slate integration:
- Set up Comm100 Integration from Slate
- Set up Slate Integration from Comm100
- Remap Comm100 and Slate Fields
Create Interaction Codes
Follow the instructions to create interaction codes for Chat, offline message, and ticket message.
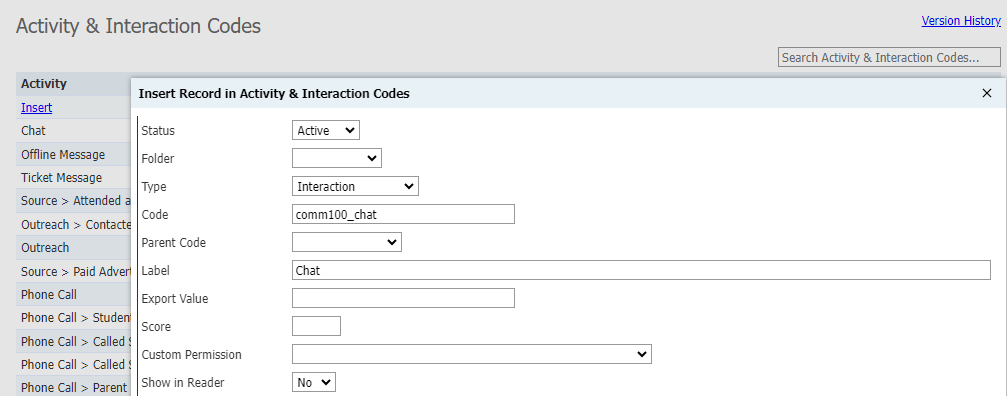
- In your Slate system, go to Database, and click Activity / Interaction Codes under Records and Datasets.
- Click Insert to create an interaction code.
- In the Insert Record Activity & Interaction Codes window, set the parameters for Chat as follows, then click Save.
- Status: Active
- Type: Interaction
- Code: comm100_chat
- Label: Chat
- Show In Reader: No
- Create an Interaction code for Offline Message, set the parameters as follows, and click Save.
- Status: Active
- Type: Interaction
- Code: comm100_offline_message
- Label: Offline Message
- Show In Reader: No
- Create an Interaction code for Ticket Message, set the parameters as follows, and click Save.
- Status: Active
- Type: Interaction
- Code: comm100_ticket_message
- Label: Ticket Message
- Show In Reader: No
Create a Person Identification Query
Follow the instructions to create a Person Identification Query.
- In your Slate system, go to Queries / Reports > Queries, and click New Query.
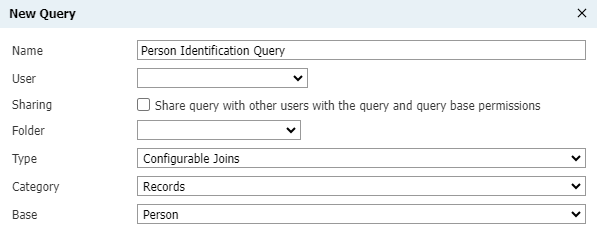
- In the New Query window, set the parameters as follows, then click Save.
- Name: Person Identification Query
- Type: Configurable Joins
- Category: Records
- Base: Person
- Click the created query in the list, then click Edit Query > Edit Web Service.
- In the Edit Web Service window, set the parameters as follows, and click Save.
- Custom Parameters:
<param id="ReferenceId" type="varchar" /> <param id="Email" type="varchar" /> <param id="Phone" type="varchar" /> - Service Type: JSON
- Custom Parameters:
- In the Filters area, click the Subquery button to add a Subquery filter.
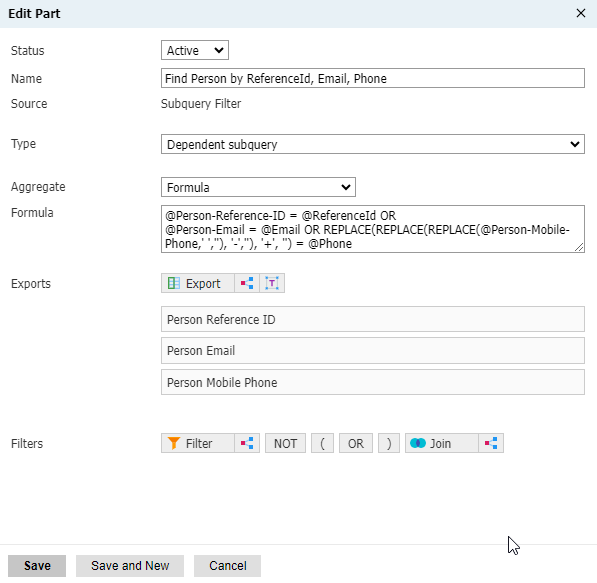
- In the Edit Part window, set the parameters as follows, then click Save.
- Status: Active
- Name: Find Person by ReferenceId, Email, Phone
- Type: Dependent subquery
- Aggregate: Formula
- Formula:
@Person-Reference-ID = @ReferenceId OR @Person-Email = @Email OR REPLACE(REPLACE(REPLACE(@Person-Mobile-Phone,' ',''), '-',''), '+', '') = @Phone - Exports: Choose Person Reference ID, Person Email, and Person Mobile Phone under Direct Exports.
- On the Edit Query page, click Export under the Exports area.
- In the Insert Query Part window, scroll down to Direct Exports, choose the following fields, then click Continue.
- Reference ID
- First
- Last
- Status
- Birthdate
- Current Age Based on Birthdate
- Sex
- Mobile Phone
- Record URL
- Create a user token for query web service:
- Under the Edit Query area, click Edit Permissions.
- Click Add Grantee.
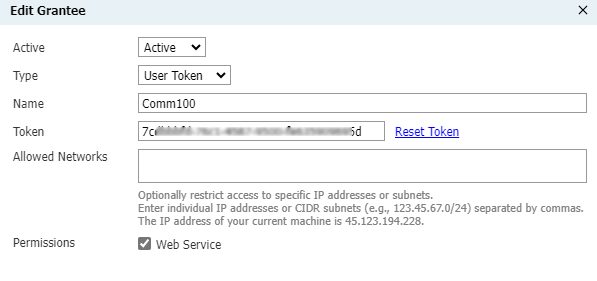
- Set the parameters as follows, then click Save. A user token is generated automatically, and you can reset it.
- Active: Active
- Type: User Token
- Name: Comm100
- Permissions: Enable Web Service
- Find and copy the Query URL:
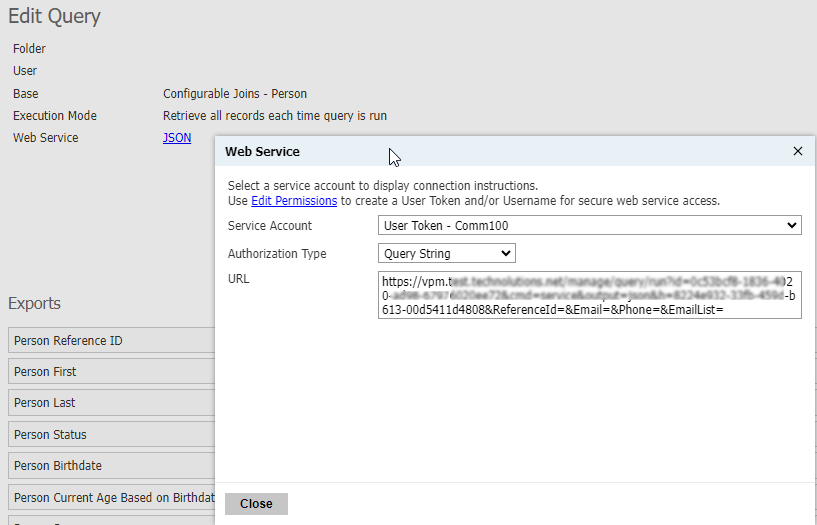
- Click the JSON link.
- In the Web Service window, choose User Token – Comm100 for Service Account, keep the Authorization Type as Query String.
- Copy the URL for later use.
Create Source Formats
Follow the instructions to create source formats for Person, Chat, Offline message, and Ticket Message:
- In your Slate system, go to Database > Import and Data Processing > Source Formats.
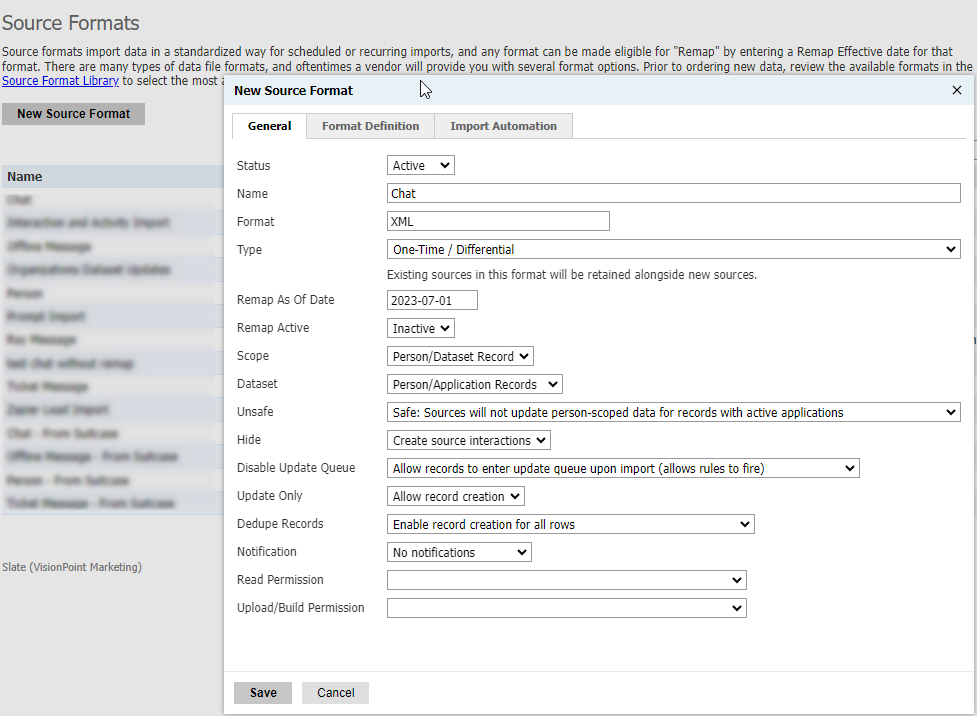
- Click New Source Format.
- For Chat source format, set the parameters as follows, then click Save.
- General
- Name: Chat
- Format: XML
- Type: One-Time / Differential type
- Remap As Of Date: Today's date, such as 2023-01-01
- Remap Active: Inactive
- Update Only: Allow record creation
- Format Definition
                        <layout type="json" node="/interactions">
                          <f id="Slate Person Reference ID" s="personReferenceId" />
                          <f id="Person First Name" s="personFirst" />
                          <f id="Person Last Name" s="personLast" />
                          <f id="Person Birthdate" s="personBirthdate" />
                          <f id="Person Sex" s="personSex" />
                          <f id="Person Email" s="personEmail" />
                          <f id="Person Mobile Phone" s="personMobilePhone" />
                          <f id="Comm100 Chat Subject" s="message/subject" />
                          <f id="Comm100 Chat Content" s="message/content" />
                          <f id="Comm100 Chat Created Time" s="message/createdTime" />
                        </layout>
- General
- For Offline Message source format, set the parameters as follows, then click Save.
- General
- Name: Offline Message
- Format: XML
- Type: One-Time / Differential type
- Remap As Of Date: Today's date, such as 2023-01-01
- Remap Active: Inactive
- Update Only: Allow record creation/li>
- Format Definition
        <layout type="json" node="/interactions">
          <f id="Slate Person Reference ID" s="personReferenceId" />
          <f id="Person First Name" s="personFirst" />
          <f id="Person Last Name" s="personLast" />
          <f id="Person Birthdate" s="personBirthdate" />
          <f id="Person Sex" s="personSex" />
          <f id="Person Email" s="personEmail" />
          <f id="Person Mobile Phone" s="personMobilePhone" />
          <f id="Comm100 Offline Message Subject" s="message/subject" />
          <f id="Comm100 Offline Message Content" s="message/content" />
          <f id="Comm100 Offline Message Created Time" s="message/createdTime" />
        </layout>
- General
- For Ticket Message source format, set the parameters as follows, then click Save.
- General
- Name: Ticket Message
- Format: XML
- Type: One-Time / Differential type
- Remap As Of Date: Today's date, such as 2023-01-01
- Remap Active: Inactive
- Update Only: Allow record creation
- Format Definition
        <layout type="json" node="/interactions">
          <f id="Slate Person Reference ID" s="personReferenceId" />
          <f id="Person First Name" s="personFirst" />
          <f id="Person Last Name" s="personLast" />
          <f id="Person Birthdate" s="personBirthdate" />
          <f id="Person Sex" s="personSex" />
          <f id="Person Email" s="personEmail" />
          <f id="Person Mobile Phone" s="personMobilePhone" />
          <f id="Comm100 Message Ticket Subject" s="message/subject" />
          <f id="Comm100 Message Content" s="message/content" />
          <f id="Comm100 Message Created Time" s="message/createdTime" />
        </layout>
- General
- For Person source format, set the parameters as follows, then click Save.
- General:
- Name: Person
- Format: XML
- Type: One-Time / Differential type
- Remap As Of Date: Today's date, such as 2023-01-01
- Remap Active: Inactive
- Update Only: Allow record creation
- Format Definition
        <layout type="json" node="/persons">
          <f id="Slate Person Reference ID" s="personReferenceId" />
          <f id="Person First Name" s="personFirst" />
          <f id="Person Last Name" s="personLast" />
          <f id="Person Birthdate" s="personBirthdate" />
          <f id="Person Sex" s="personSex" />
          <f id="Person Email" s="personEmail" />
          <f id="Person Mobile Phone" s="personMobilePhone" />
        </layout>
- General:
- Open each source format that you have created, click the View link.
- Under the Standardtab, copy the URL for later use.
The source format URLs will be used when setting up Slate integration from Comm100.
Create a Service Account
- In your Slate system, go to Database > Users & Access > User Permissions.
- Click New User.
- Complete the settings:
- Input First Name, Last Name, and Email.
- For User Type, choose Service Account.
- Input the User ID and Password.
- Active: Select the Enable account for access checkbox.
- Click Save. Copy the User ID and Password for later use.
After you have set up Comm100 integration from Slate, you can set up the integration on Comm100 with the information collected from Slate system.
Prerequisite
Before you start, make sure you have collected the following information from Slate:
- Slate domain: such as example.technolutions.net
- Your Service Account Username and Password
- The Person Identification Query URL
- The Source Format URLs of Person, Chat, Offline Message, and Ticket Message
Step by Step Instructions
To set up Slate integration from Comm100, follow these steps:
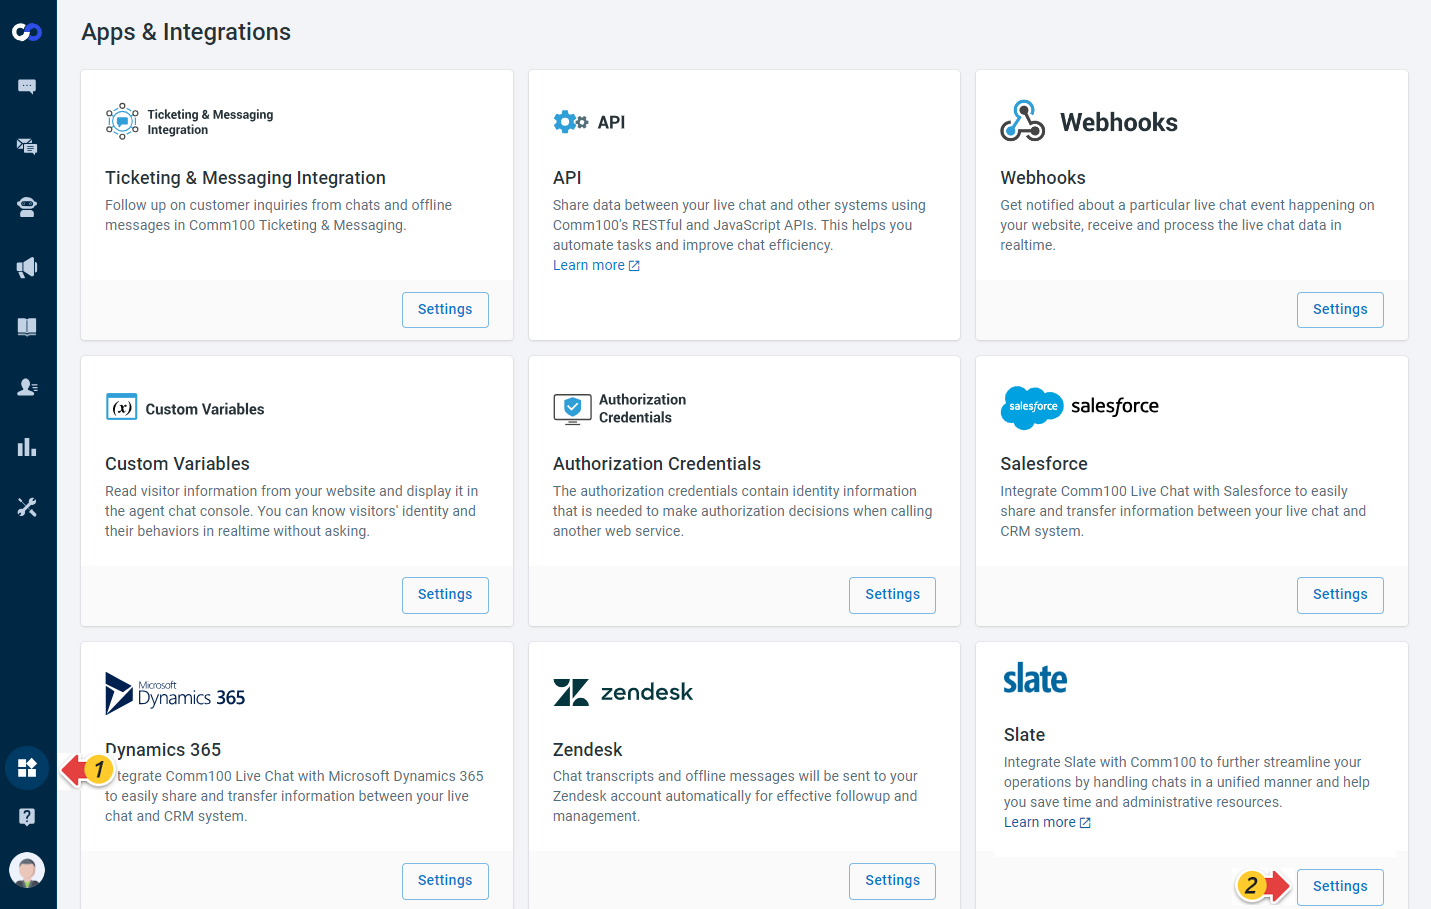
- Log in to the Comm100 Control Panel.
- From the left navigation menu, go to Apps & Integrations.
- Go to the Slate card, and click Settings. The Slate page shows the steps to set up the integration.
- Click I’m Ready. Next to proceed to Step 2.
- Input the information you collected from Slate, choose the time zone of your Slate system and click Next.
- Choose to integrate Slate with Live Chat, Ticketing & Messaging, or both based on your requirements.
- Complete the settings for Live Chat and Ticketing & Messaging integration. See Reference: Configurations for Slate Integration for details.
- Click Save. The integration settings are saved successfully. You need to send sample data to Slate for subsequent remapping.
- For first time use, click Send Sample Data Now. After sample data is sent, you can remap fields in the Slate system.
- If you enable Live Chat integration, the system sends sample data of a chat and an offline message to Slate.
- If you enable Ticketing & Messaging integration, the system sends sample data of a ticket message to Slate.

Reference: Configurations for Slate integration
Configurations for Slate Integration with Live Chat
If you enable Slate integration in Live Chat, you need to complete the following configurations:
- Chat Source Format URL and Offline Message Source Format URL: Input the URLs collected from your Slate system.
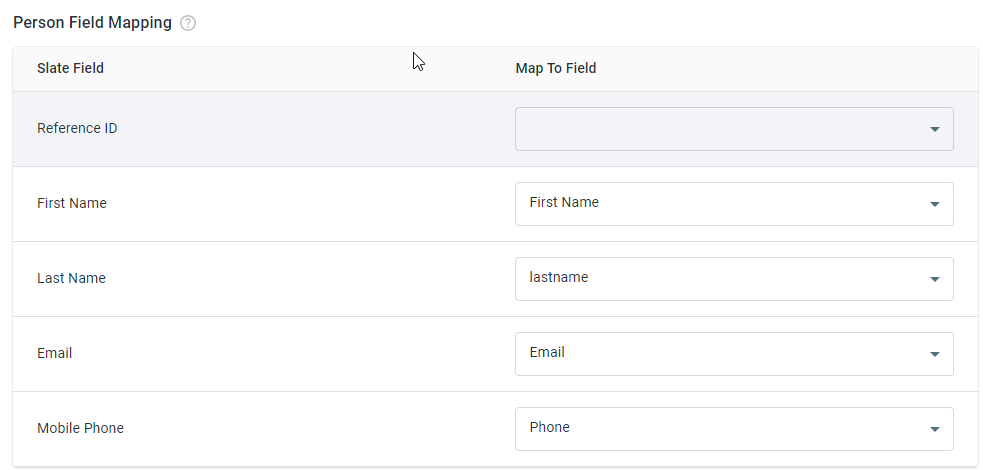
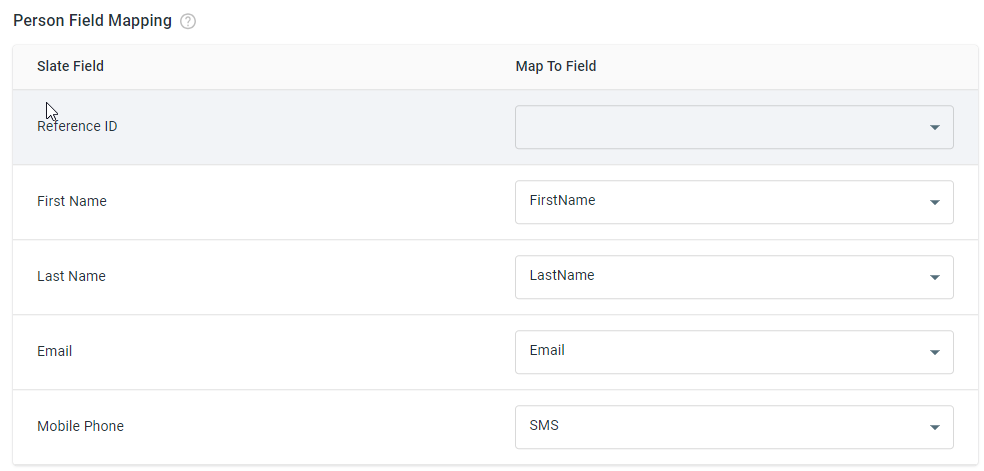
- Person Field Mapping: Map Slate fields with Comm100 Live Chat fields.
The fields are used to identify a person. The Slate fields to be mapped include Reference ID, First name, Last name, Email, and Mobile phone.
When identifying a person, Reference ID, Email, and Mobile phone are used by sequence as the identifier. That is, if a person’s Reference ID is not empty, it is used to identify a person, then Email and Mobile phone.- If Reference ID, Email, and Mobile phone are all empty, the person cannot be identified.
- If multiple persons can be matched in the Slate system, the first person in the query result list is used.
- Comm100 system fields include Name, while Slate fields include First name and Last name. When mapping the Slate fields First name and Last name, you need to create custom fields in the Comm100 system.
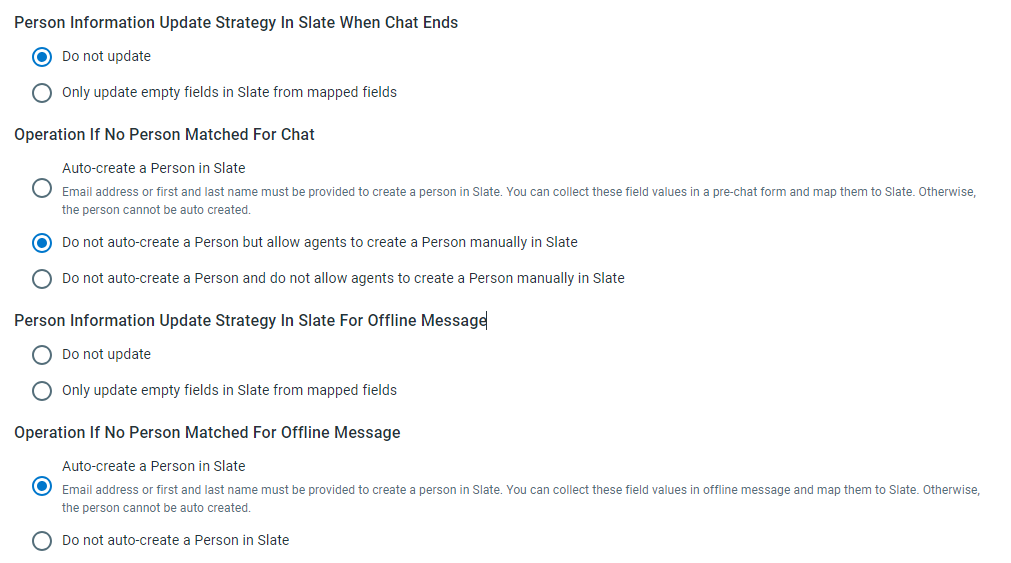
- Person Information Update Strategy in Slate when Chat Ends: Whether to update a person’s information when a chat ends.
- Do not update: Do not update a person’s information in Slate.
- Only update empty fields in Slate from mapped fields: Keep a person’s existing information in Slate, and update new fields from Live Chat.
- Operation if No Person Matched for Chat: When the system finds no match for a visitor from Live Chat in Slate, whether to create the visitor as a Person in Slate.
- Auto-create a Person in Slate: Automatically create the visitor as a Person in Slate.
- Do not auto-create a Person but allow agents to create a Person manually in Slate: The system does not create a Person, but agents can create the visitor as a Person from Comm100.
- Do not auto-create a Person and do not allow agents to create a Person manually in Slate: The system does not create a Person, and agents cannot create a Person from the Agent Console.
- Person Information Update Strategy in Slate for Offline Message: Whether to update a person’s information when receiving an offline message.
- Do not update: Do not update a person’s information in Slate.
- Only update empty fields in Slate from mapped fields: Keep a person’s existing information in Slate, and update new fields from Live Chat.
- Operation if No Person Matched for Offline Message: When the system finds no match for a visitor from Offline Message in Slate, whether to create the visitor as a Person in Slate.
- Auto-create a Person in Slate: Automatically create the visitor as a Person in Slate.
- Do not auto-create a Person but allow agents to create a Person manually in Slate: The system does not create a Person, but agents can create the visitor as a Person from Comm100.
- Do not auto-create a Person and do not allow agents to create a Person manually in Slate: The system does not create a Person, and agents cannot create a Person from Comm100.
Configurations for Slate Integration with Ticketing & Messaging
- Ticket Message Source Format URL: Input the URL collected from your Slate system.
- Person Field Mapping
Map Slate fields with Comm100 Contact fields or Channel Identities. The fields are used to identify a person. The Slate fields to be mapped include Reference ID, First name, Last name, Email, and Mobile phone. TM config.png
When identifying a person, Reference ID, Email, and Mobile phone are used by sequence as the unique identifier. That is, if a person’s Reference ID is not empty, it is used to identify a person, then Email and Mobile phone.- If Reference ID, Email, and Mobile phone are all empty, the person cannot be identified.
- If multiple persons can be matched in the Slate system, the first person in the query result list is used.
- Comm100 system fields include Name, while Slate fields include First name and Last name. When mapping the Slate fields First name and Last name, you need to create custom fields in the Comm100 system.
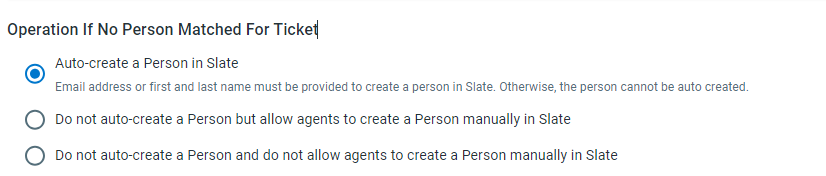
- Operation If No Person Matched for Ticket: When the system finds no match for a contact from Ticketing & Messaging in Slate, whether to create the visitor as a Person in Slate.
- Auto-create a Person in Slate: Automatically create the contact as a Person in Slate.
- Do not auto-create a Person but allow agents to create a Person manually in Slate: The system does not create a Person, but agents can create the contact as a Person from Comm100.
- Do not auto-create a Person and do not allow agents to create a Person manually in Slate: The system does not create a Person, and agents cannot create a Person from Comm100.
After you have set up Slate integration and sent sample data to Slate from Comm100, you need to remap Comm100 fields in your Slate system to complete the integration.
Remap Person Source Format
- In your Slate system, go Database > Import and Data Processing > Source Formats.
- In the source format list, open the Person source format, and click Remap.
- Set value mapping for Sex field:
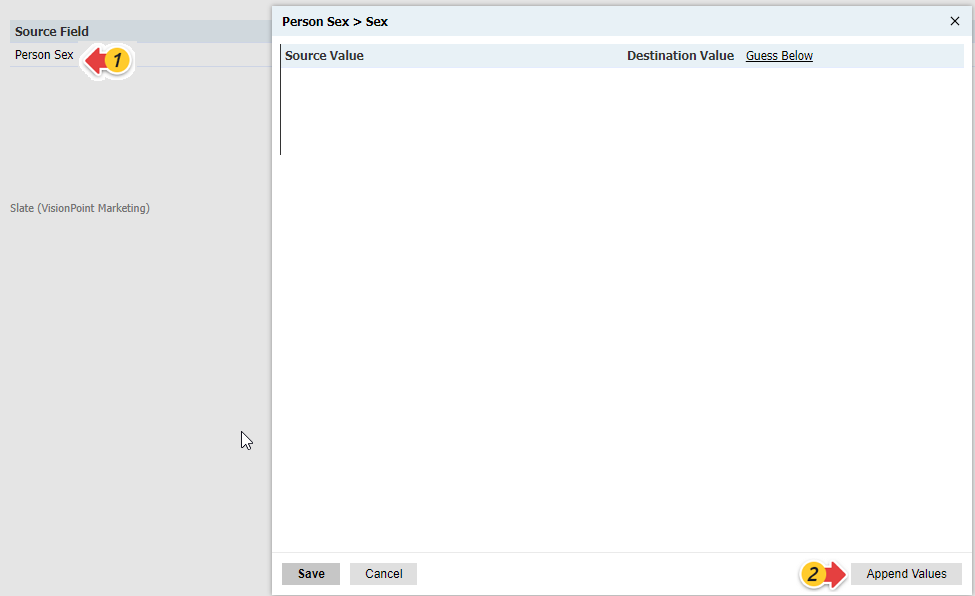
- Click Prompt Value Mappings on the right side.
- Click Person Sex, then click Append Values in the popup window.
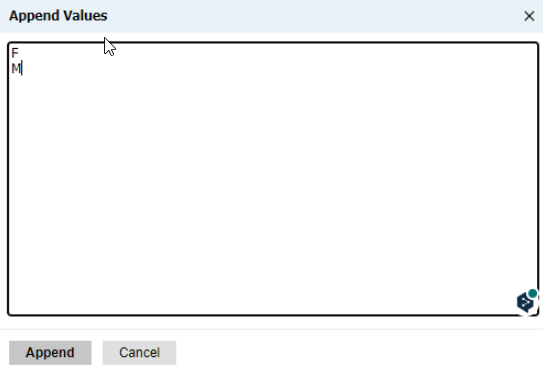
- Input F and M as follows, then click Append.
- Set the Destination Values of F and M as Female and Male respectively. Then click Save.
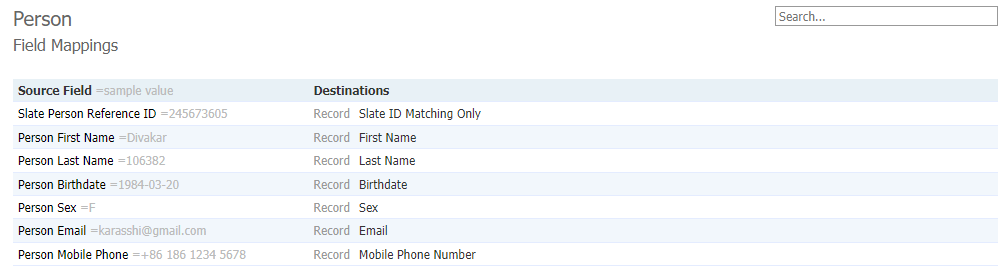
- On the Person Field Mappings page, remap the Source Fields to Destinations as follows, and save your settings.
- Remap Slate Person Reference ID to: Record > Slate ID Matching Only
- Remap Person First Name to: Record > First Name
- Remap Person Last Name to: Record > Last Name
- Remap Person Birthdate to: Record > Birthdate
- Remap Person Sex to: Record > Sex
- Remap Person Email to: Record > Email
- Remap Person Mobile Phone to: Record > Mobile Phone Number

Remap Chat Source Format
- In your Slate system, go Database > Import and Data Processing > Source Formats.
- In the source format list, open the Chat source format.
- Click Remap, then click Static Mappings on the right side.
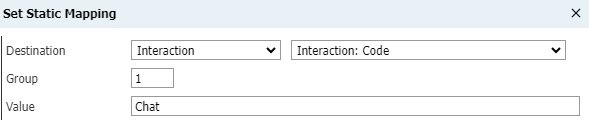
- Click New Static Mapping, complete the settings as follows, then click Save.
- Destination: Interaction > Interaction: Code
- Group: 1
- Value: Chat
- Set value mapping for Sex field:
- Click Prompt Value Mappings on the right side.
- Click Person Sex, then click Append Values in the popup window.
- Input F and M, then click Append.
- Set the Destination Value of F and M as Female and Male respectively. Then click Save.
- On the Chat Field Mappings page, remap the Chat Source Fields to Destinations as follows, and save your settings.
- Remap Slate Person Reference ID to: Record > Slate ID Matching Only
- Remap Person First Name to: Record > First Name
- Remap Person Last Name to: Record > Last Name
- Remap Person Birthdate to: Record > Birthdate
- Remap Person Sex to: Record > Sex
- Remap Person Email to: Record > Email
- Remap Person Mobile Phone to: Record > Mobile Phone Number
- Remap Comm100 Chat Subject to: Interaction > Interaction: Subject
- Remap Comm100 Chat Content to: Interaction > Interaction: Private Comments
- Remap Comm100 Chat Created Time to: Interaction > Interaction: Date

Remap Offline Message Source Format
- In your Slate system, go Database > Import and Data Processing > Source Formats.
- In the source format list, open the Offline Message source format.
- Click Remap, then click Static Mappings on the right side.
- Click New Static Mapping, complete the settings as follows, then click Save.
- Destination: Interaction > Interaction: Code
- Group: 1
- Value: Chat
- Set value mapping for Sex field:
- Click Prompt Value Mappings on the right side.
- Click Person Sex, then click Append Values in the popup window.
- Input F and M, then click Append.
- Set the Destination Value of F and M as Female and Male respectively. Then click Save.
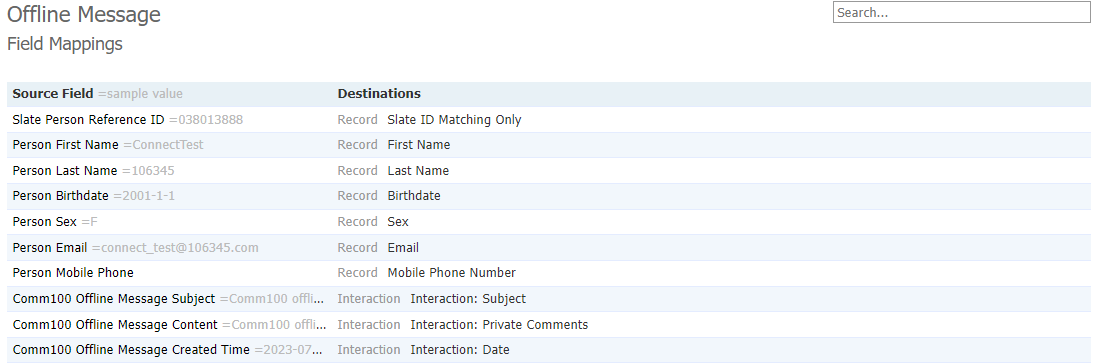
- On the Offline Message Field Mappings page, remap the Source Fields to Destinations as follows, and save your settings.
- Remap Slate Person Reference ID to: Record > Slate ID Matching Only
- Remap Person First Name to: Record > First Name
- Remap Person Last Name to: Record > Last Name
- Remap Person Birthdate to: Record > Birthdate
- Remap Person Sex to: Record > Sex
- Remap Person Email to: Record > Email
- Remap Person Mobile Phone to: Record > Mobile Phone Number
- Remap Comm100 Offline Message Subject to: Interaction > Interaction: Subject
- Remap Comm100 Offline Message Content to: Interaction > Interaction: Private Comments
- Remap Comm100 Offline Message Created Time to: Interaction > Interaction: Date
Remap Ticket Message Source Format
- In your Slate system, go Database > Import and Data Processing > Source Formats.
- In the source format list, open the Ticket Message source format.
- Click Remap, then click Static Mappings on the right side.
- Click New Static Mapping, complete the settings as follows, then click Save.
- Destination: Interaction > Interaction: Code
- Group: 1
- Value: Offline Message
- Set value mapping for Sex field:
- Click Prompt Value Mappings on the right side.
- Click Person Sex, then click Append Values in the popup window.
- Input F and M, then click Append.
- Set the Destination Value of F and M as Female and Male respectively. Then click Save.
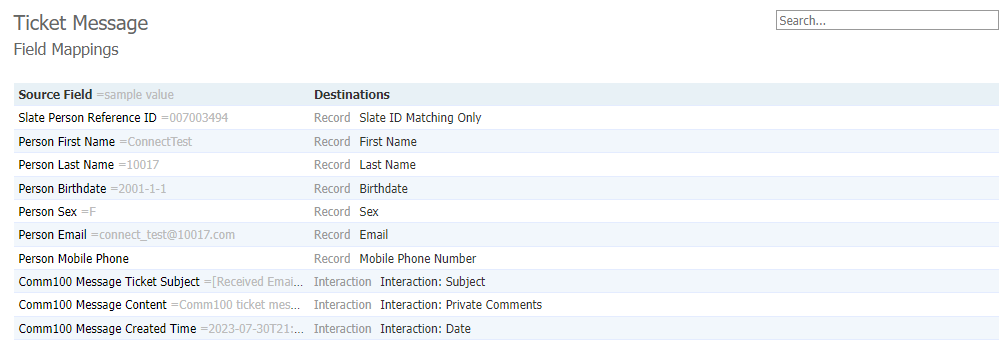
- On the Ticket Message Field Mappings page, remap the Chat Source Fields to Destinations as follows, and save your settings.
- Remap Slate Person Reference ID to: Record > Slate ID Matching Only
- Remap Person First Name to: Record > First Name
- Remap Person Last Name to: Record > Last Name
- Remap Person Birthdate to: Record > Birthdate
- Remap Person Sex to: Record > Sex
- Remap Person Email to: Record > Email
- Remap Person Mobile Phone to: Record > Mobile Phone Number
- Remap Comm100 Ticket Subject to: Interaction > Interaction: Subject
- Remap Comm100 Ticket Content to: Interaction > Interaction: Private Comments
- Remap Comm100 Ticket Created Time to: Interaction > Interaction: Date
Activate the Remapping for the Source Formats
After you have remapped the 4 source formats, you need to activate the remapping for the source formats.
- In your Slate system, go Database > Import and Data Processing > Source Formats.
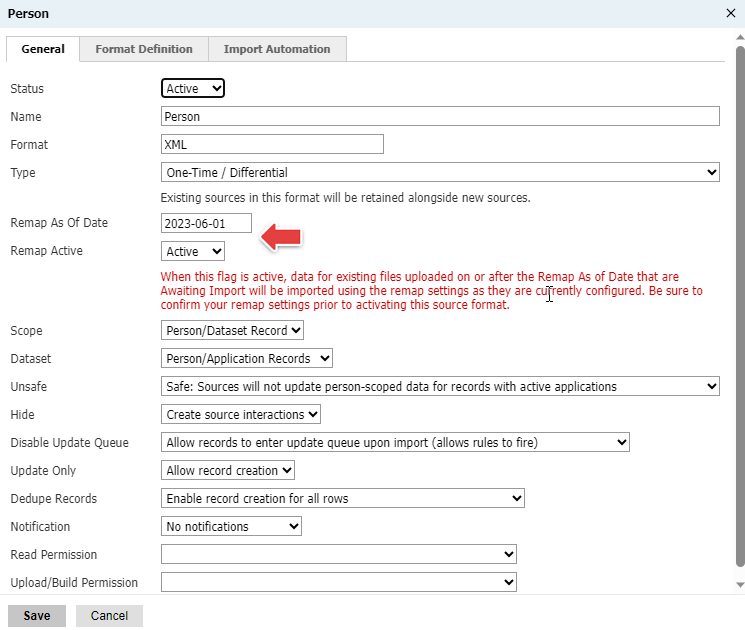
- In the source format list, open the Person source format, and click Edit.
- On the Person window, set the following parameters:
- Remap As Of Date: Today’s date
- Remap Active: Active
- Click Save.
- Repeat the steps to activate the remapping for Chat, Offline Message, and Ticket Message source formats.
After you have remapped the source formats, the sample data sent by Comm100 can be synchronized to your Slate system. Navigate to the sample person you just imported, you can see a chat, an offline message, and a ticket message in the person’s timeline.