Comm100 Voice is designed for businesses offering call center customer services. The Voice system helps you communicate with your customers over phone calls. You can manage phone lines, route incoming calls, and set up operating schedules for your team more efficiently.
To use Comm100 Voice, you need to connect your account and set up phone lines first. This article describes the procedure to connect your account and set up your Voice service:
- Connect the voice provider
- Add a phone line
- Set up the phone line
- Set up the Voice service
After your Voice service is set up successfully, your call center agents can answer and manage the calls on the Agent Console. To learn more about how agents can handle the calls from the Agent Console, see this article.
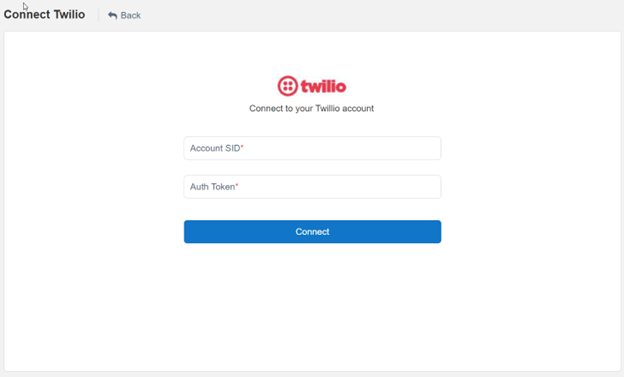
To start using Comm100 Voice, you need to connect a Twilio account. If you do not have an existing Twilio account, go to Twilio to register a new one.
To connect your Twilio account, follow these steps:
- Log in to the Comm100 Control Panel.
- From the left navigation menu, go to Voice > Voice Provider.
- Input the Account SID and Auth Token of your Twilio account.
- Click Connect. Your Twilio account is successfully connected to Comm100.
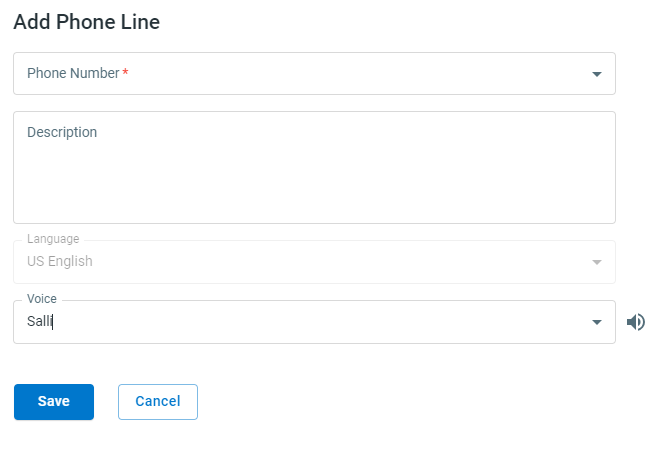
A phone line contains a phone number that can be used for inbound and outbound calls and related flow configurations. You need to add a phone number from the connected Twilio account. If you want to use a phone number that does not belong to the connected account, you can port this number to your account first.
To add a phone line, follow these steps:
- On the Comm100 Control Panel, navigate to Voice > Phone Lines.
- Click Add Phone Line. The Add Phone Line drawer appears from the right side.
- Select a phone number from the drop-down list. All active numbers in your Twilio account are listed. You can also add a description for the phone line.Note: Once a phone line is created, the phone number cannot be changed.
- Click Save. The phone line is successfully added.
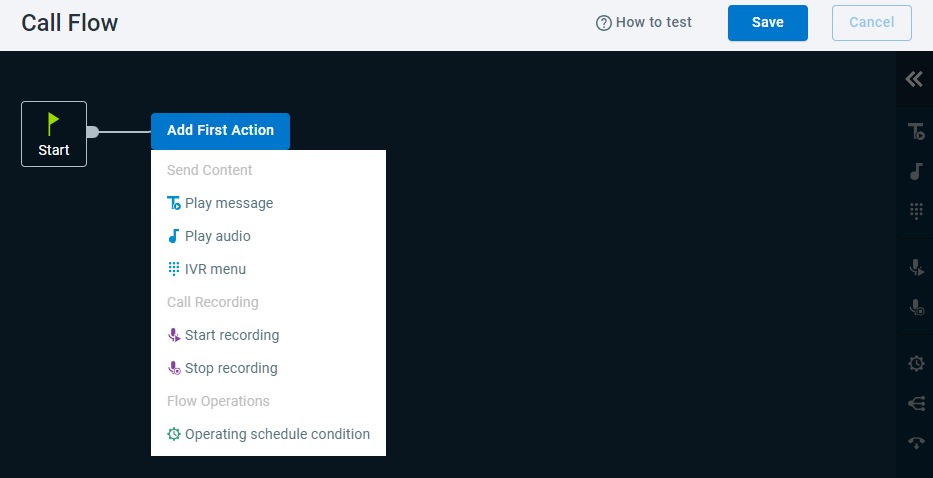
After a phone line is created, you need to set up the call flow to direct the incoming calls. You can also customize the advanced settings to cater to your business requirements.
Edit the Call Flow
Call flow is a flow of responsive actions for all incoming calls to the phone number. For example, when a customer calls, you can play a welcome message, collect an answer about the customer’s purpose, and then route the customer to a suitable agent based on the feedback.
The following table shows the actions available for the call flow:
Action | Description |
Send Content | |
Play message | Play the text message to the caller. |
Play audio | Play an audio file to the caller.
|
IVR menu | The interactive Voice Response (IVR) Menu allows the agent to send a series of options to the caller. Callers can choose an option by pressing a key. You can use this action to route callers to a dedicated workflow. |
Call Recording | |
Start recording | Start recording the phone call. |
Stop recording | Stop recording the phone call. |
Flow Operations | |
Operating schedule condition | Give different responses based on the operating schedule. You can define the operating schedule from Voice > Settings > Operating Schedules. See Operation Schedule for details. |
Route call | Route the call to an agent, a department, or a specified phone number. Note: You can only route calls to departments which are available in the Voice system. Go to Global Settings > People > Departments to verify if Voice is enabled for a department. |
End call | End the call. |
To edit the phone line’s call flow, follow these steps:
- On the Comm100 Control Panel, navigate to Voice > Phone Lines > Call Flow. Note: If you have multiple phone lines, choose the correct one from the drop-down list.
- On the Call Flow page, click Add First Action, and choose the action from the action menu that appears.
- Repeat adding the actions until you complete the action flow.
- Click Save.
- Call the number to test if the call flow works as expected. You can edit the call flow until it meets your requirements.
Customize the Advanced Settings
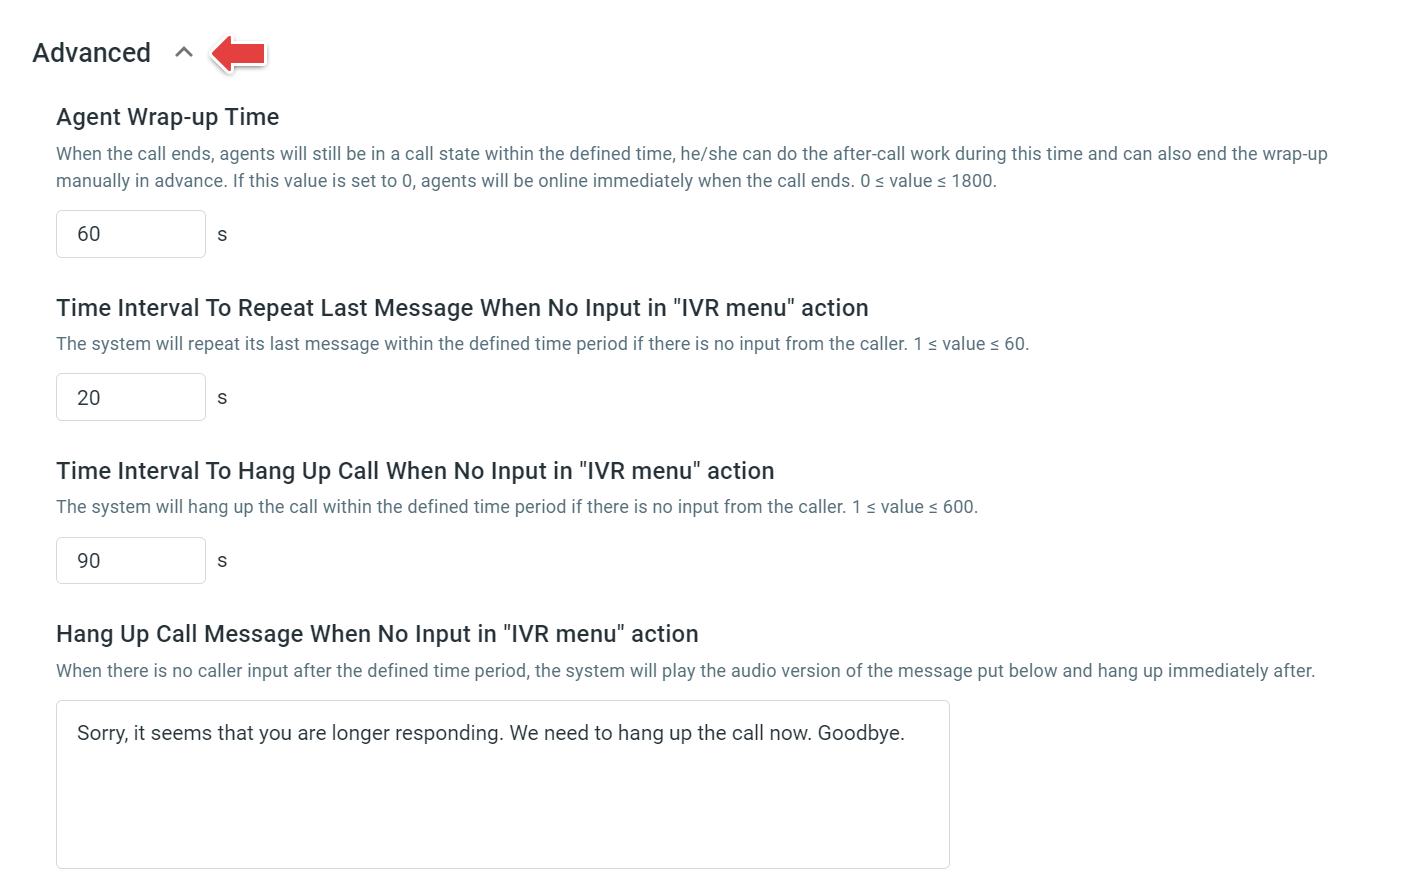
The system defines default advanced settings for all newly created phone lines, such as the time interval to repeat last message and to hang up the call when receiving no response from callers. You can change the following advanced settings by editing the phone line.
- Agent Wrap-up Time
When the call ends, agents will still be In a call status within the defined period to do the after-call wrap-up. They can also manually end the countdown and get back to online status. If this value is set to 0, agents will get online immediately after the call ends. - Time Interval to Repeat Last Message When No Input in “IVR menu” Action
If there is no input from the caller within the defined time, the system will repeat its last message. - Time Interval to Hang Up Call When No Input in “IVR menu” Action
If there is no input from the caller within the defined time, the system will hang up the call. - Hang Up Call Message When No Input in "IVR menu" Action
If there is no caller input within the defined time, the system will play the audio version of the message and hang up afterwards immediately.
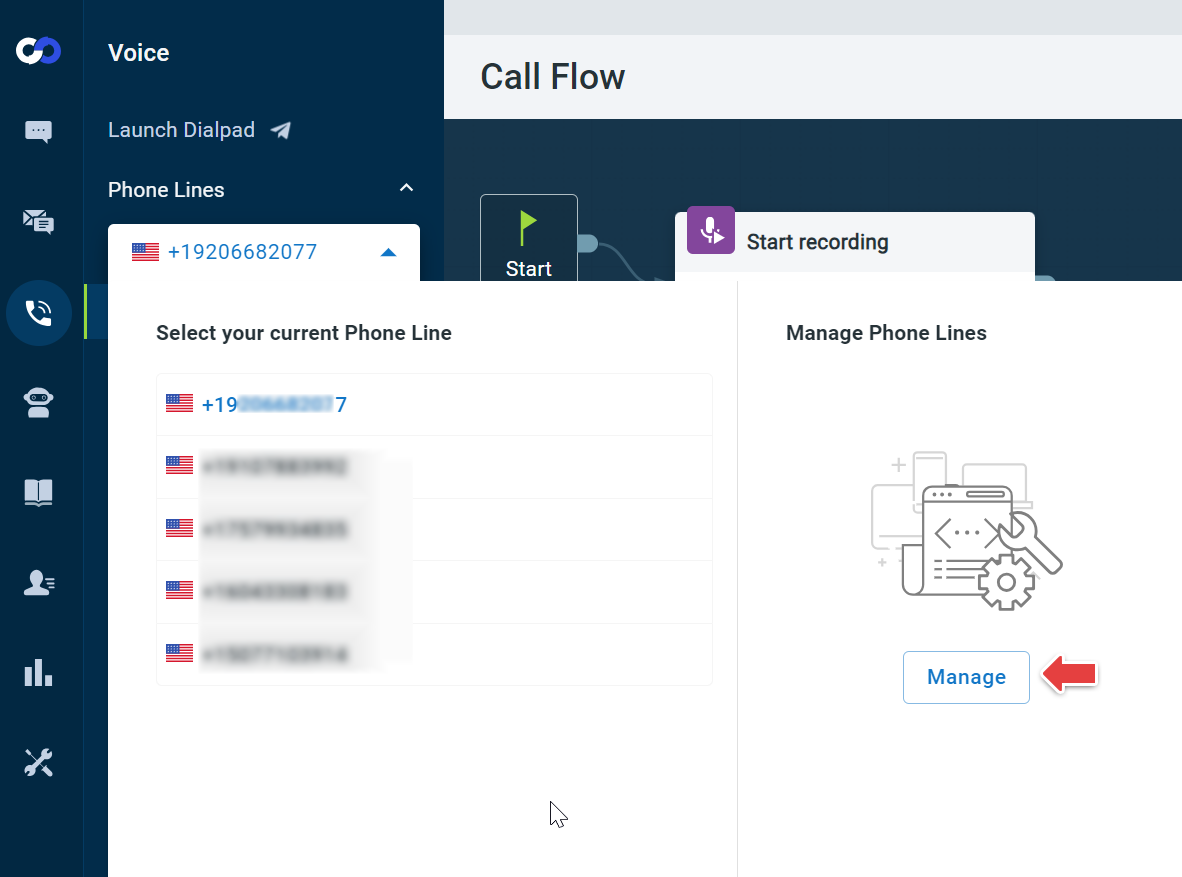
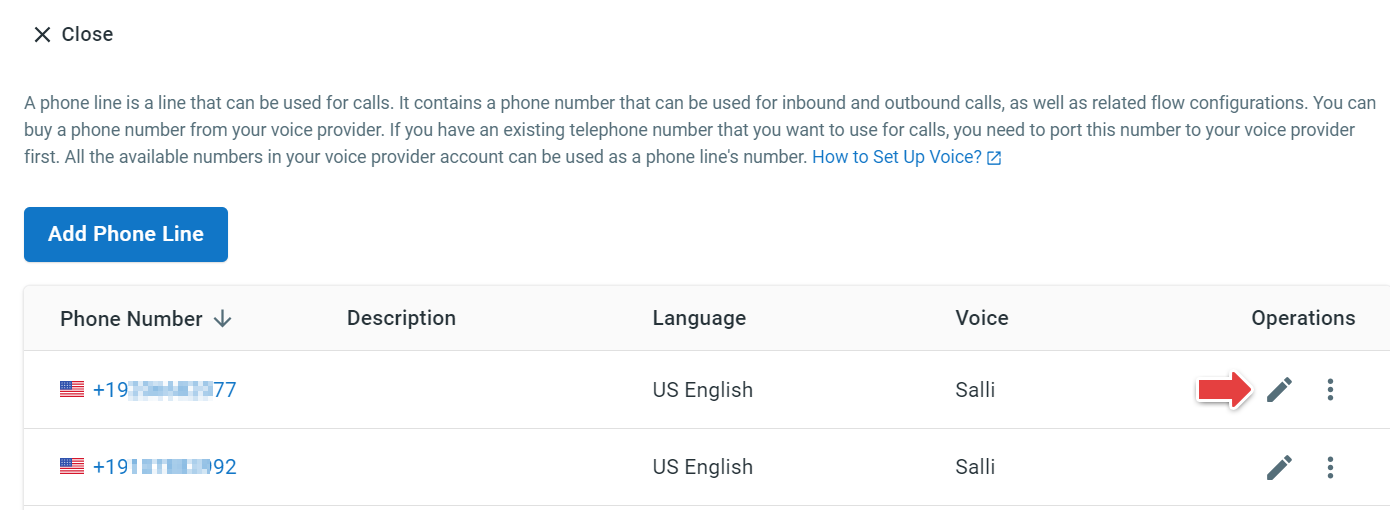
To edit a phone line, follow these steps:
- On the Comm100 Control Panel, navigate to Voice > Phone Lines, and click Manage. Note: If you have multiple phone lines, choose the correct one from the drop-down list.
- In the phone number list, click the Edit icon against the phone number.
The Edit Phone Line drawer appears. - On the Edit Phone Line drawer, expand the Advanced section and modify the parameters as required.
- Click Save. Your changes take effect immediately after the settings are saved.
To run the Voice system properly, you need to complete the settings including distribution rules and operating schedules. You can also change the voice provider information as needed.
Set Up Distribution Rules
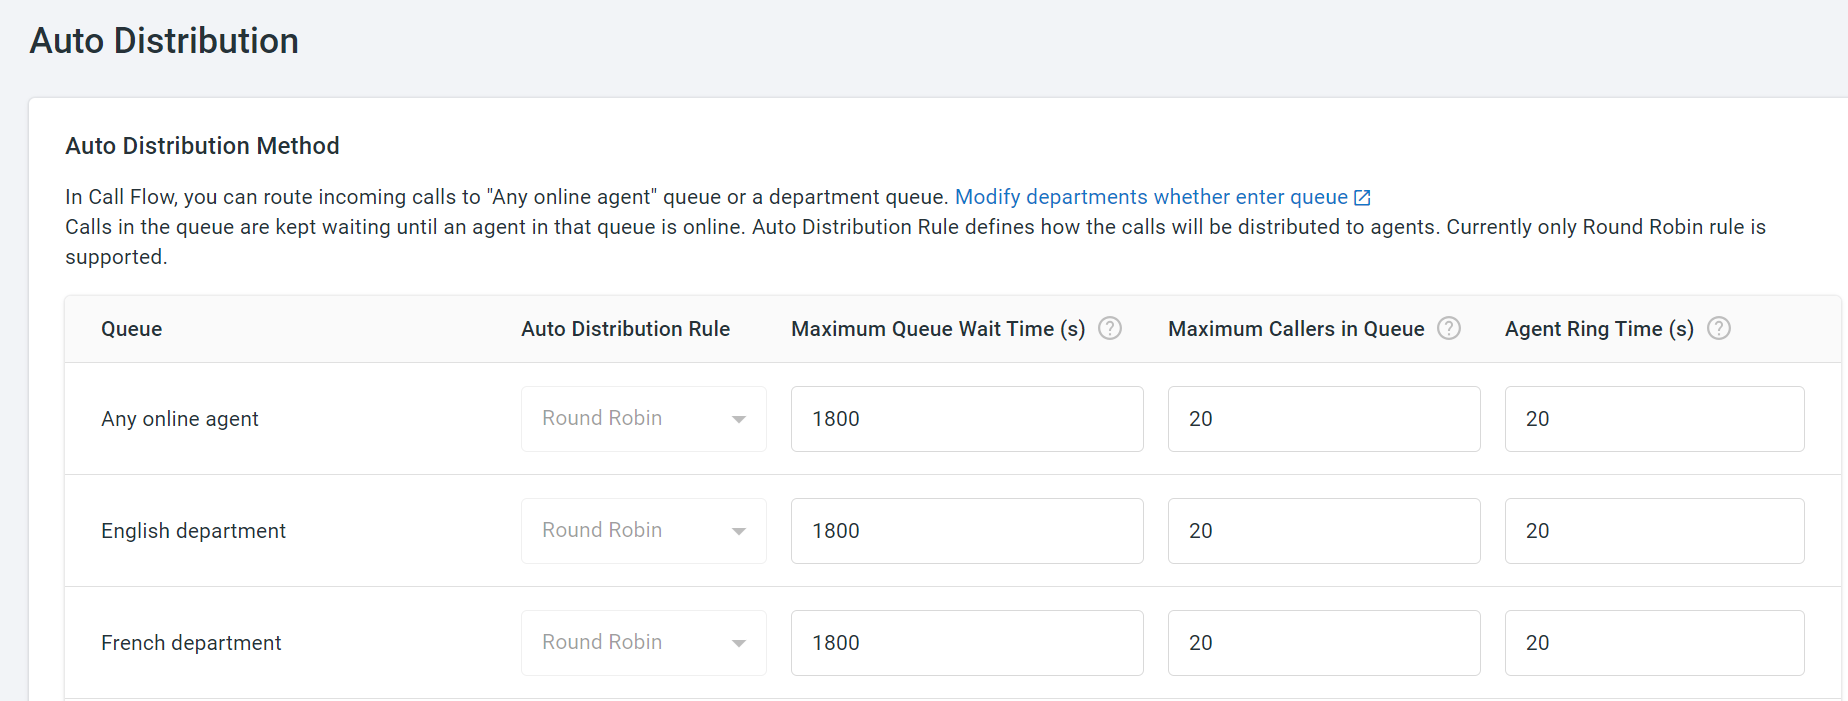
In a call flow, incoming calls are routed to “Any online agent”, a specified department or a specific phone number based on your configuration. “Any online agent” and each department is considered as a queue, and all the incoming calls will be put in the queue waiting to be distributed to an online agent. Distribution rules define how the incoming calls are distributed to agents. Comm100 Voice allows you to define the following distribution settings for “Any online agents” and each department:
- Auto Distribution Rule: Only Round Robin is supported in the July 2023 release. Calls are distributed to agents in the sequence of time when agents get online. Note:
- If all the agents in a department get “Offline” or “Away”, the existing calls in the queue are kept in the queue, and new incoming calls are distributed to the voicemail.
- During auto distribution, if a call is not answered by an agent, it goes to the next online agent by Round Robin. When every agent has been checked and nobody answers the call, it is distributed to the voicemail of the last agent who receives this call.
- Maximum Queue Wait Time: The maximum time that a call can stay in a queue unanswered. Once this limit is reached, the call will be directed to voicemail. The default value is 1800 seconds.
- Maximum Callers in Queue: The maximum number of calls that can wait in the call queue. Once this limit is reached, new incoming calls are directed to voicemail. The default value is 10.
- Agent Ring Time: The maximum time that an incoming call rings for an agent. If the agent does not answer the call in the defined period, the call goes to the next agent. If the agent rejects the call, it goes to the next agent immediately. The default value is 30 seconds.
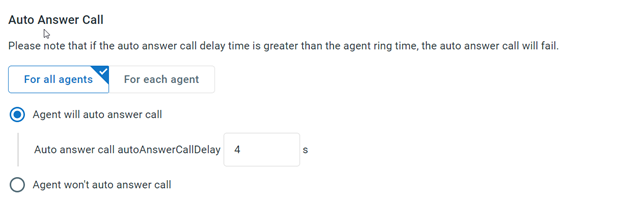
- Auto Answer Call: Calls are answered by agents without the need to be manually picked up.
- Auto Answer Delay: The call is automatically picked up after the delay. If Auto Answer Delay is longer than Agent Ring Time, the call will be transferred to the next agent before it is automatically picked up.
- Agents in a call will not be auto distributed with any new chat. But other agents can still transfer a chat to the agent, and the agent can manually take a chat.
- Agents in a chat will not be auto distributed with any new call. But other agents can still transfer a call to the agent.
To set up the distribution rules, follow these steps:
- On the Comm100 Control Panel, navigate to Voice > Settings > Auto Distribution.
- Under the Auto Distribution Method area, set the distribution rules for Any online agent and each department.Note: The Queue column shows the Any online agent option and all the departments available in Voice. If a department does not appear in the list, click Modify departments whether enter queue to modify the settings.
- Under the Auto Answer Call area, choose whether to enable auto answer call and set the auto answer delay.
- Click Save.
Set Up the Operating Schedule
Define the operating schedule for your call center. The operation schedule can be used as a condition to route calls in the call flow.
To set up the operating schedule, follow these steps:
- On the Comm100 Control Panel, navigate to Voice > Settings > Operating Schedules.
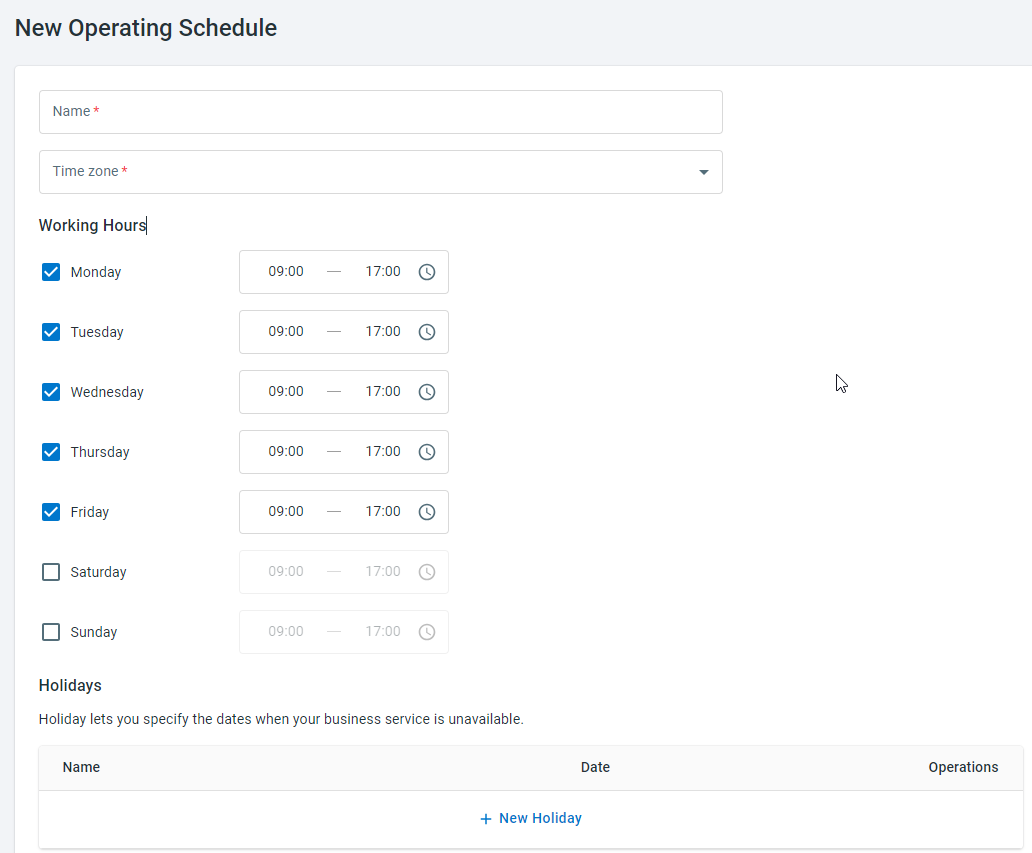
- Click New Operating Schedule.
- Complete your operating schedule settings:
- Name the operating schedule.
- Choose the time zone.
- Set the working hours of each weekday.
- Add the holidays when your call center service is unavailable.
- Click Save.
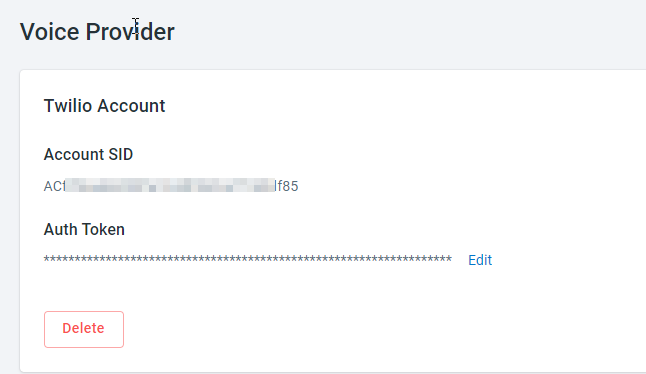
Modify the Voice Provider
You can edit the voice provider information or disconnect your Twilio account. Once a Twilio account is deleted, all the phone lines will be removed and cannot be restored.
To edit voice provider information or delete your account, follow these steps:
- On the Comm100 Control Panel, navigate to Voice > Settings > Voice Provider.
- Click Edit to modify the Auth Token or delete your account as needed.