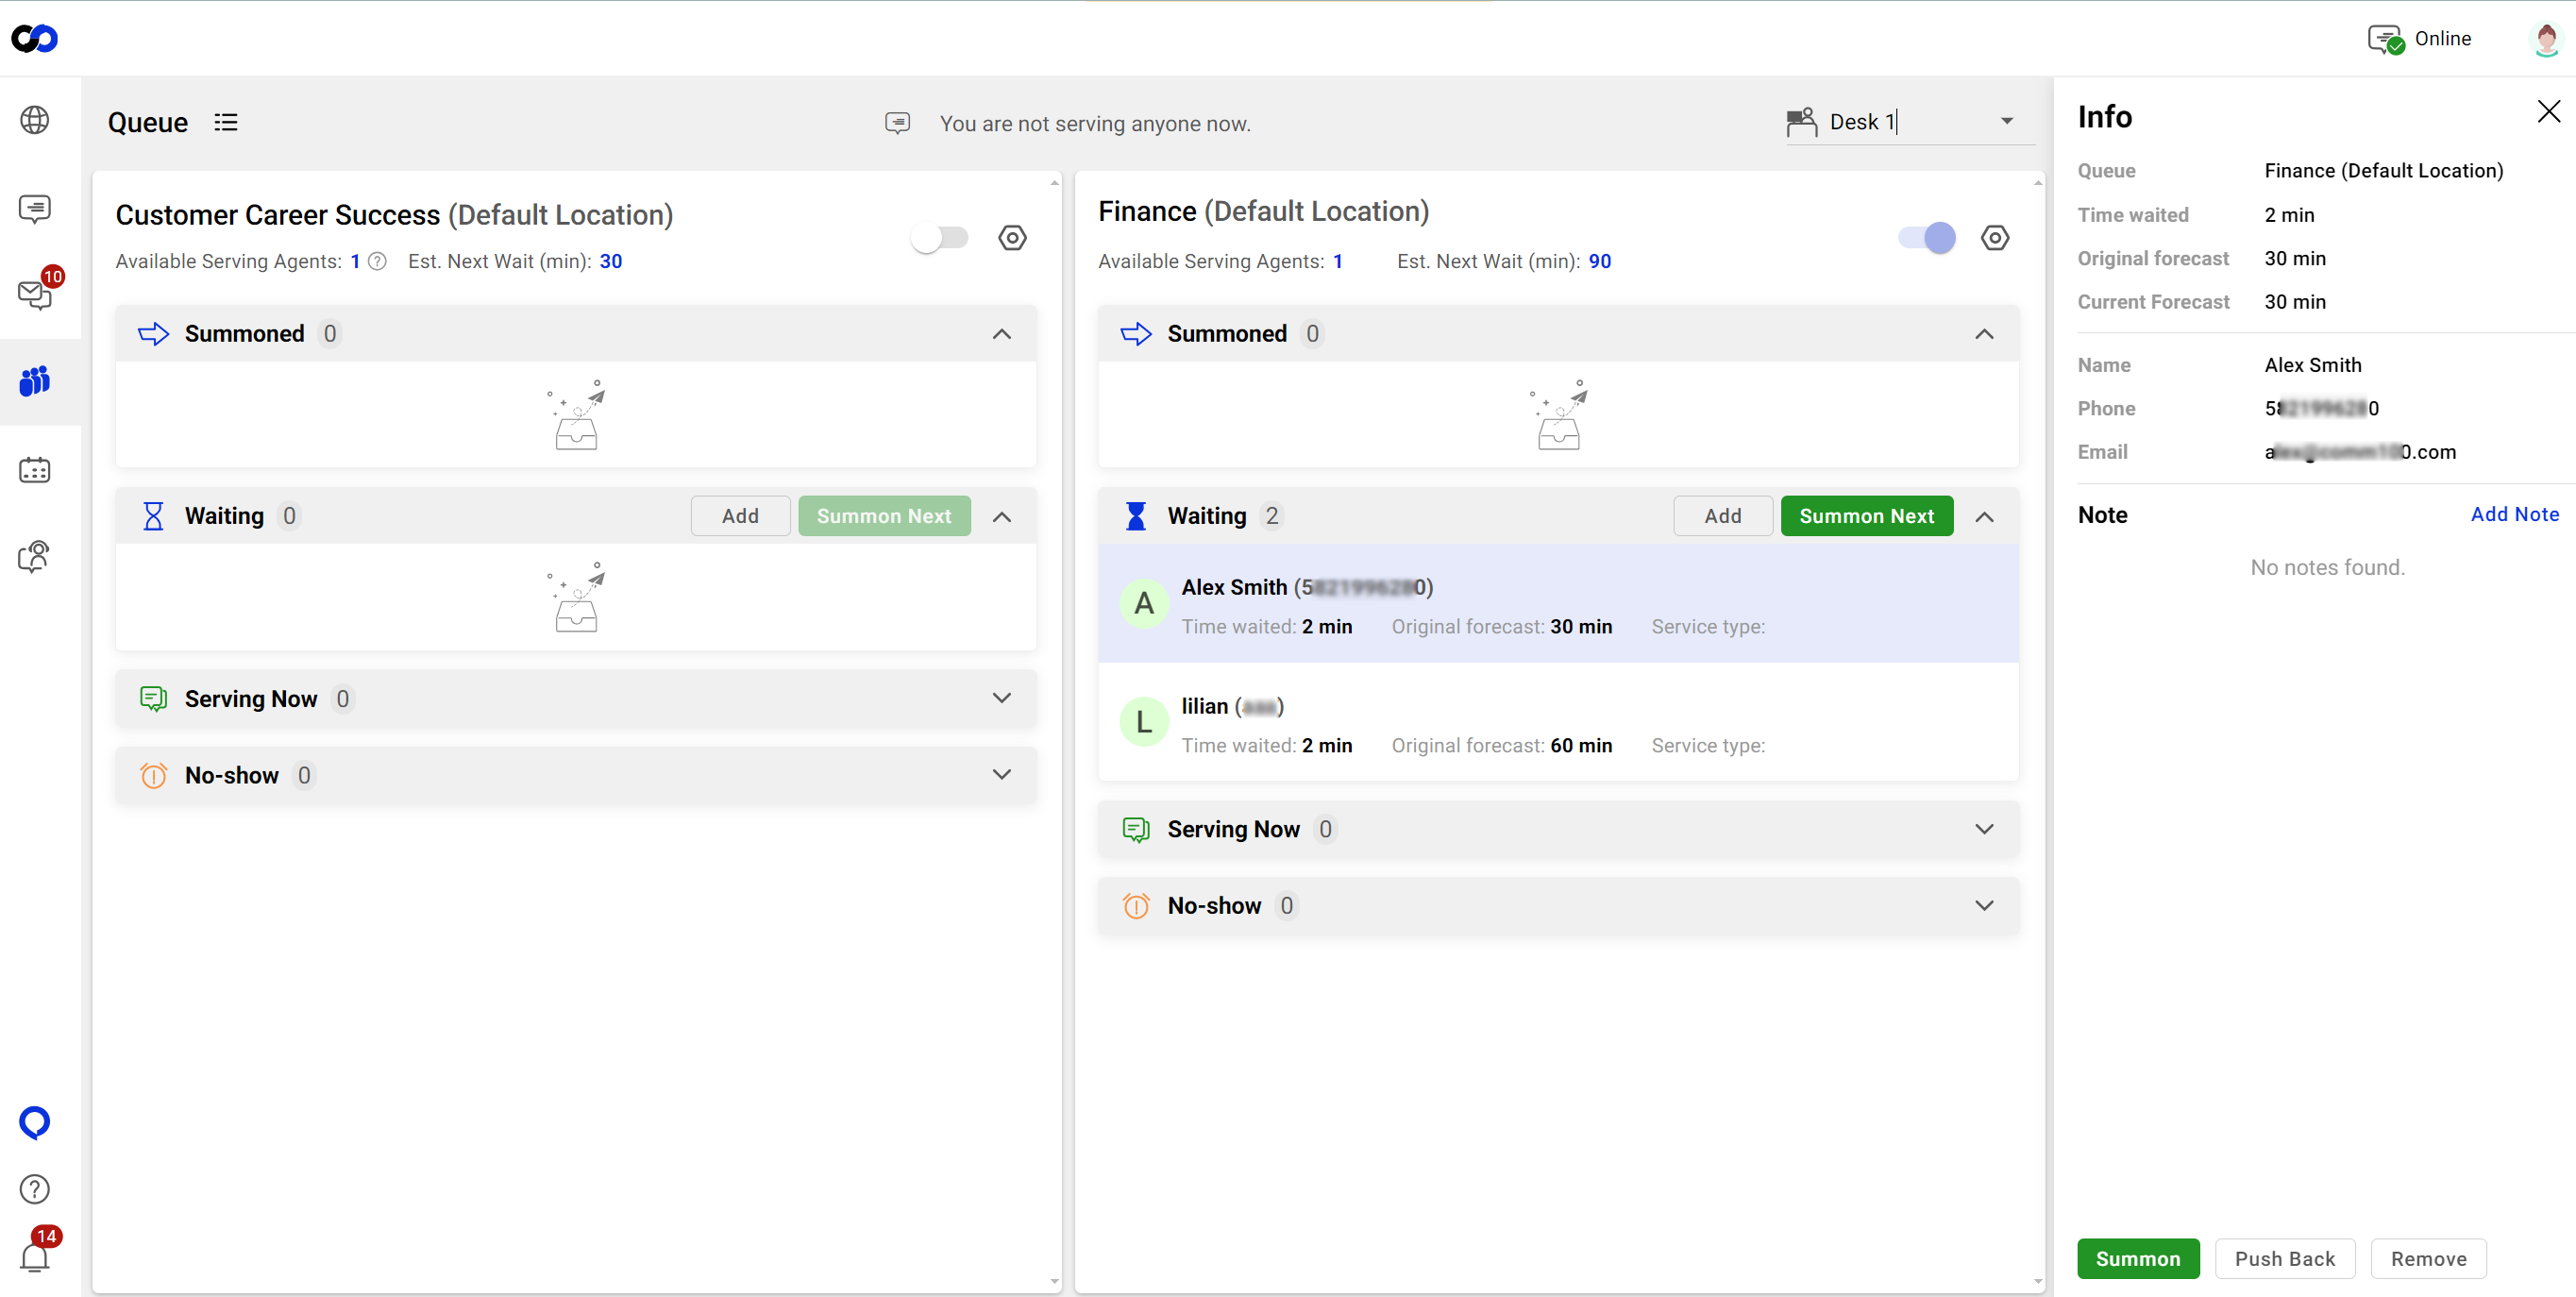
Comm100 Queue Management is a digital solution designed for businesses to handle the queue of customers. The queue solution replaces the traditional "take-a-ticket" system by allowing customers or visitors to enter a queue through a webpage from online instead of waiting in a physical line. Queue Management saves customers from waiting in long lines and increases agent productivity, thus bringing better customer experience and higher service quality.
With Comm100, queues are grouped by location. One location can contain multiple queues, which simulates the scenario where multiple branches are in the same office. Each location or queue has a unique digital link that can be shared with and accessed by customers. Customers can join a queue by choosing a queue from the location page or directly through a queue page.
The location page:
The join queue page appears after visitors choose a queue:

After visitors join the queue, agents can view, summon, and start serving customers in the queue from the Agent Console. Agents can also manage the queue by manually opening or closing the queue, marking visitors as no-shows, adding visitors to the queue, and so on.
To learn more about how agents can manage the queue from the Agent Console, see this article.
To use Queue Management, administrators need to create a queue first. This article describes the procedure to create and set up the queue:
- Set up a location
- Create a queue
- Set up a queue
- Comm100 Queue Management is independent of Comm100 Live Chat, Comm100 Ticketing & Messaging, and Comm100 Bot. You can buy it separately or use it along with other Comm100 products.
- Comm100 Queue Management is different from Comm100 Live Chat queue. To learn more about Live Chat queue, see this article.
Locations are the places where your visitors queue for services. The system comes with a default location, you can edit the default location to keep consistent branding or create a new location. One Location can have one or more queues and desks.
- Each queue represents a dedicated service type that customers are seeking. For example, you can have different queues for policy consultation and fee charging.
- A desk is a physical or digital station where an agent provides service for customers. When multiple desks are available for a location, agents need to select the desk before serving customers, so that customers can know where to proceed when being summoned.

Before creating a queue, follow the steps to set up a location:
- Log in to the Comm100 Control Panel.
- From the left navigation menu, go to Queue > Locations.
- On the Locations page, click Default Location to edit it, or click New Location to create a new one.
- Complete the settings for the location page.
- Give the location a name.
- Upload a logo.
- Choose the theme color.
- Edit the greeting message to show on the location page.
- If you are editing the location, you can add queues to this location. You can create a queue by clicking Manage Queues under Queues.
- (Optional) Add desks to the location. You can skip this step if the Location has only one desk.
- Click Save. The location is created successfully.
After you set up the location, you can create a queue under it.
To create a queue, follow these steps:
- From the left navigation menu, go to Queue > Queues.
- On the Queues page, click New Queue.
- Input the queue name and choose the location for the queue.
- Click Save. The queue is created with default settings.
To run Queue Management on your site properly, you need to complete the queue settings including the join queue page, agent assignment, working hours, language, and notifications. When completing the settings, you can get and implement the link of the queue webpage on your website to make it accessible to your customers.
Customize the Join Queue Page
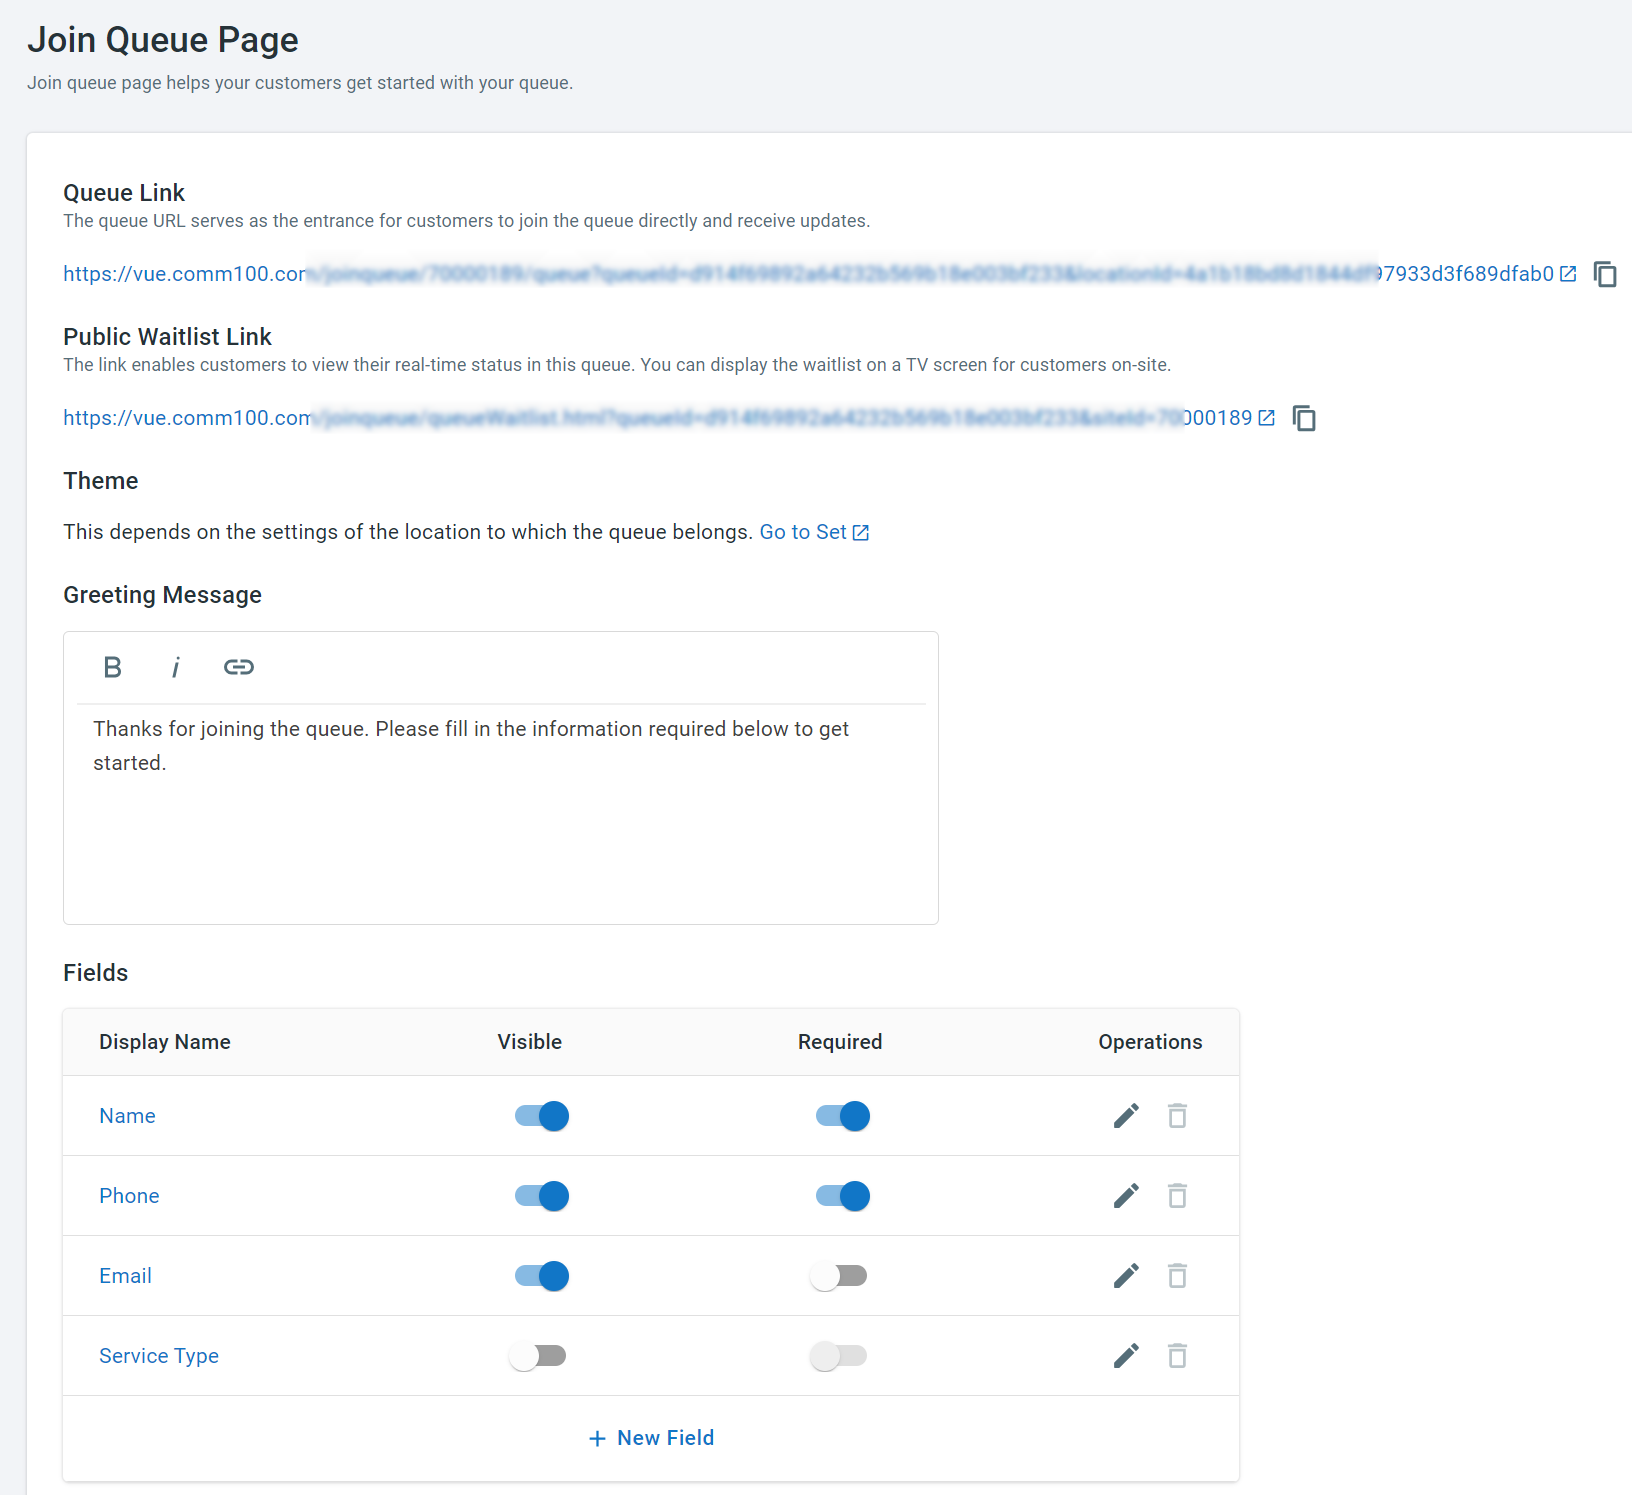
The join queue page is the webpage through which your customers enter the queue. The Join Queue Page menu includes the queue link, public waitlist link, theme, and settings of greeting message and information collection form.
- The queue link is for customers to join the queue. The link is generated automatically after the queue is created.
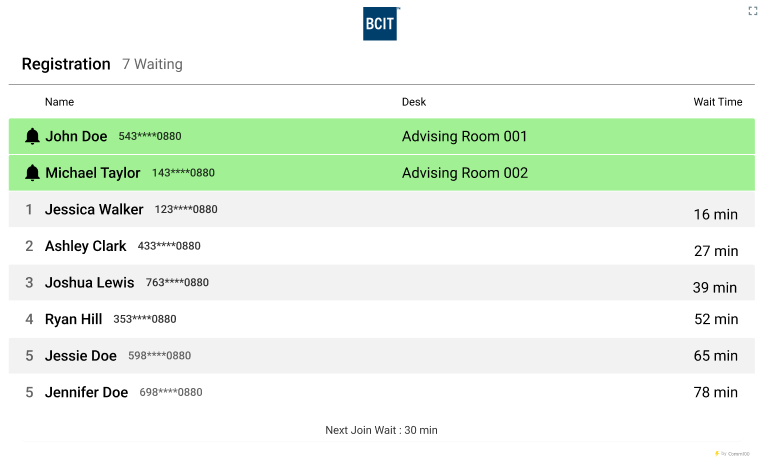
- The public waitlist shows the queue updates in real-time. You can show the waitlist on a screen using the system-generated waitlist link.
- The theme of the join queue page is the same as that of the queue's location. If you want to change a theme, you need to change the theme for the location.
- By default, the join queue page includes a greeting message and a form to collect customers' information, such as name and phone number. You can customize the greeting message and information items to collect.
To customize the Join Queue page, follow these steps:
- On the Comm100 Control Panel, navigate to Queue > Queues > Join Queue Page.Note: If you have multiple queues, make sure to choose the correct one from the drop-down list.
- Copy the queue link and waitlist link as per your requirements.
- To change the theme of the page, click Go to Set to change the settings for the location.
- Edit the greeting message based on your requirements.
- Edit the information fields that you want to collect from your visitors. You can set the fields as required or visible or add new fields to the form.
- Click Save.
Assign Resources to the Queue
You need to assign agents to the queue so that they can view and serve customers from the queue. You can also customize the following settings that affect your team's availability.
- Initial Serve Duration
When the queue starts, the system calculates customers’ Estimated Wait Time based on Initial Serve Duration. When the service starts, the average time of the last 20 serve durations is used instead. - Summon to No-show Time
When a customer is summoned but fails to arrive within the specified period, the system automatically moves the customer to the no-show list. Agents can also manually mark customers as no-shows. - No-show to Removed Time
After a customer is marked as a no-show for the specified period, the system automatically removes the customer from the list.
To assign resources to a queue, follow these steps:
- On the Comm100 Control Panel, navigate to Queue > Queues > Resources.Note: If you have multiple queues, make sure to choose the correct one from the drop-down list.
- On the Resources page, choose the agents for the queue.
- Set Initial Serve Duration, Summon to No-show Time, and No-show to Removed Time based on your requirements.
- Click Save.
Set Working Hours & Holidays
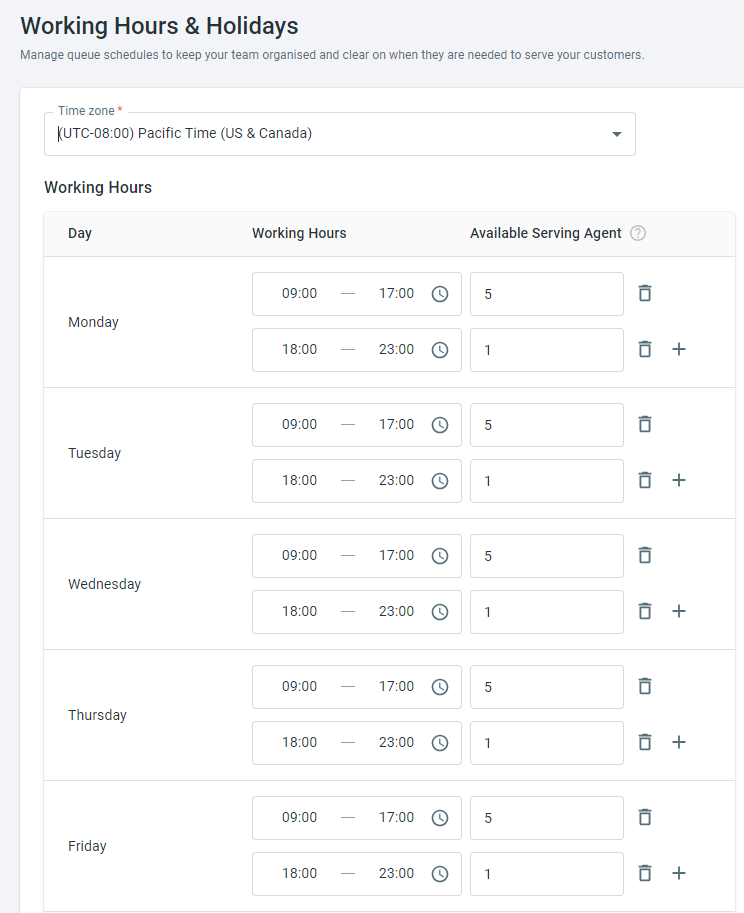
Set working hours and holidays to define when your team is open to customers. For each workday, you can set up multiple working hour periods and define the number of available serving agents for each period.
- By default, the queue is open to customers during the defined working hours and automatically closed outside the duration. Agents can also manually open or close the queue on the Agent Console.
- The number of available serving agents is used to calculate customers' Estimated Wait Time in the queue page. You can define the number here, and agents can also update the number on the Agent Console in real-time.
- When customers join the queue or wait in line, they can see the Estimated Wait Time through the queue webpage. The formula for calculating the wait time is: [(Queue position - 1)/ (Available serving agents + 1)] * Average time of the latest 20 serve durations.
- The number of available serving agents is not defined by the number of agents assigned to this queue. Administrators and agents with the Manage All Queues permission can view and serve customers from any queue even if they are not assigned to the queue. To learn how to configure agents' permission, see this article.
To set working hours and holidays, follow these steps:
- On the Comm100 Control Panel, navigate to Queue > Queues > Working Hours & Holidays.Note: If you have multiple queues, make sure to choose the correct one from the drop-down list.
- On the Working Hours & Holidays page, choose a time zone.
- Set the working hours and corresponding available serving agents for every weekday. You can offer different service availability for different time periods. For example, you can set five agents for daytime and one for evening hours.
- In the Holidays section, click New Holiday to add new holidays.
- Click Save.
Edit Visitor-Side Text and Messages
You can modify all the language items showing to visitors throughout the queue process, including the button text on the join queue page, the notice before and after visitors join the queue, and so on.
To modify visitor-side language items, follow these steps:
- On the Comm100 Control Panel, navigate to Queue > Queues > Language.Note: If you have multiple queues, make sure to choose the correct one from the drop-down list.
- On the Language page, modify the language items based on your needs.
- Click Save.
Customize Notifications
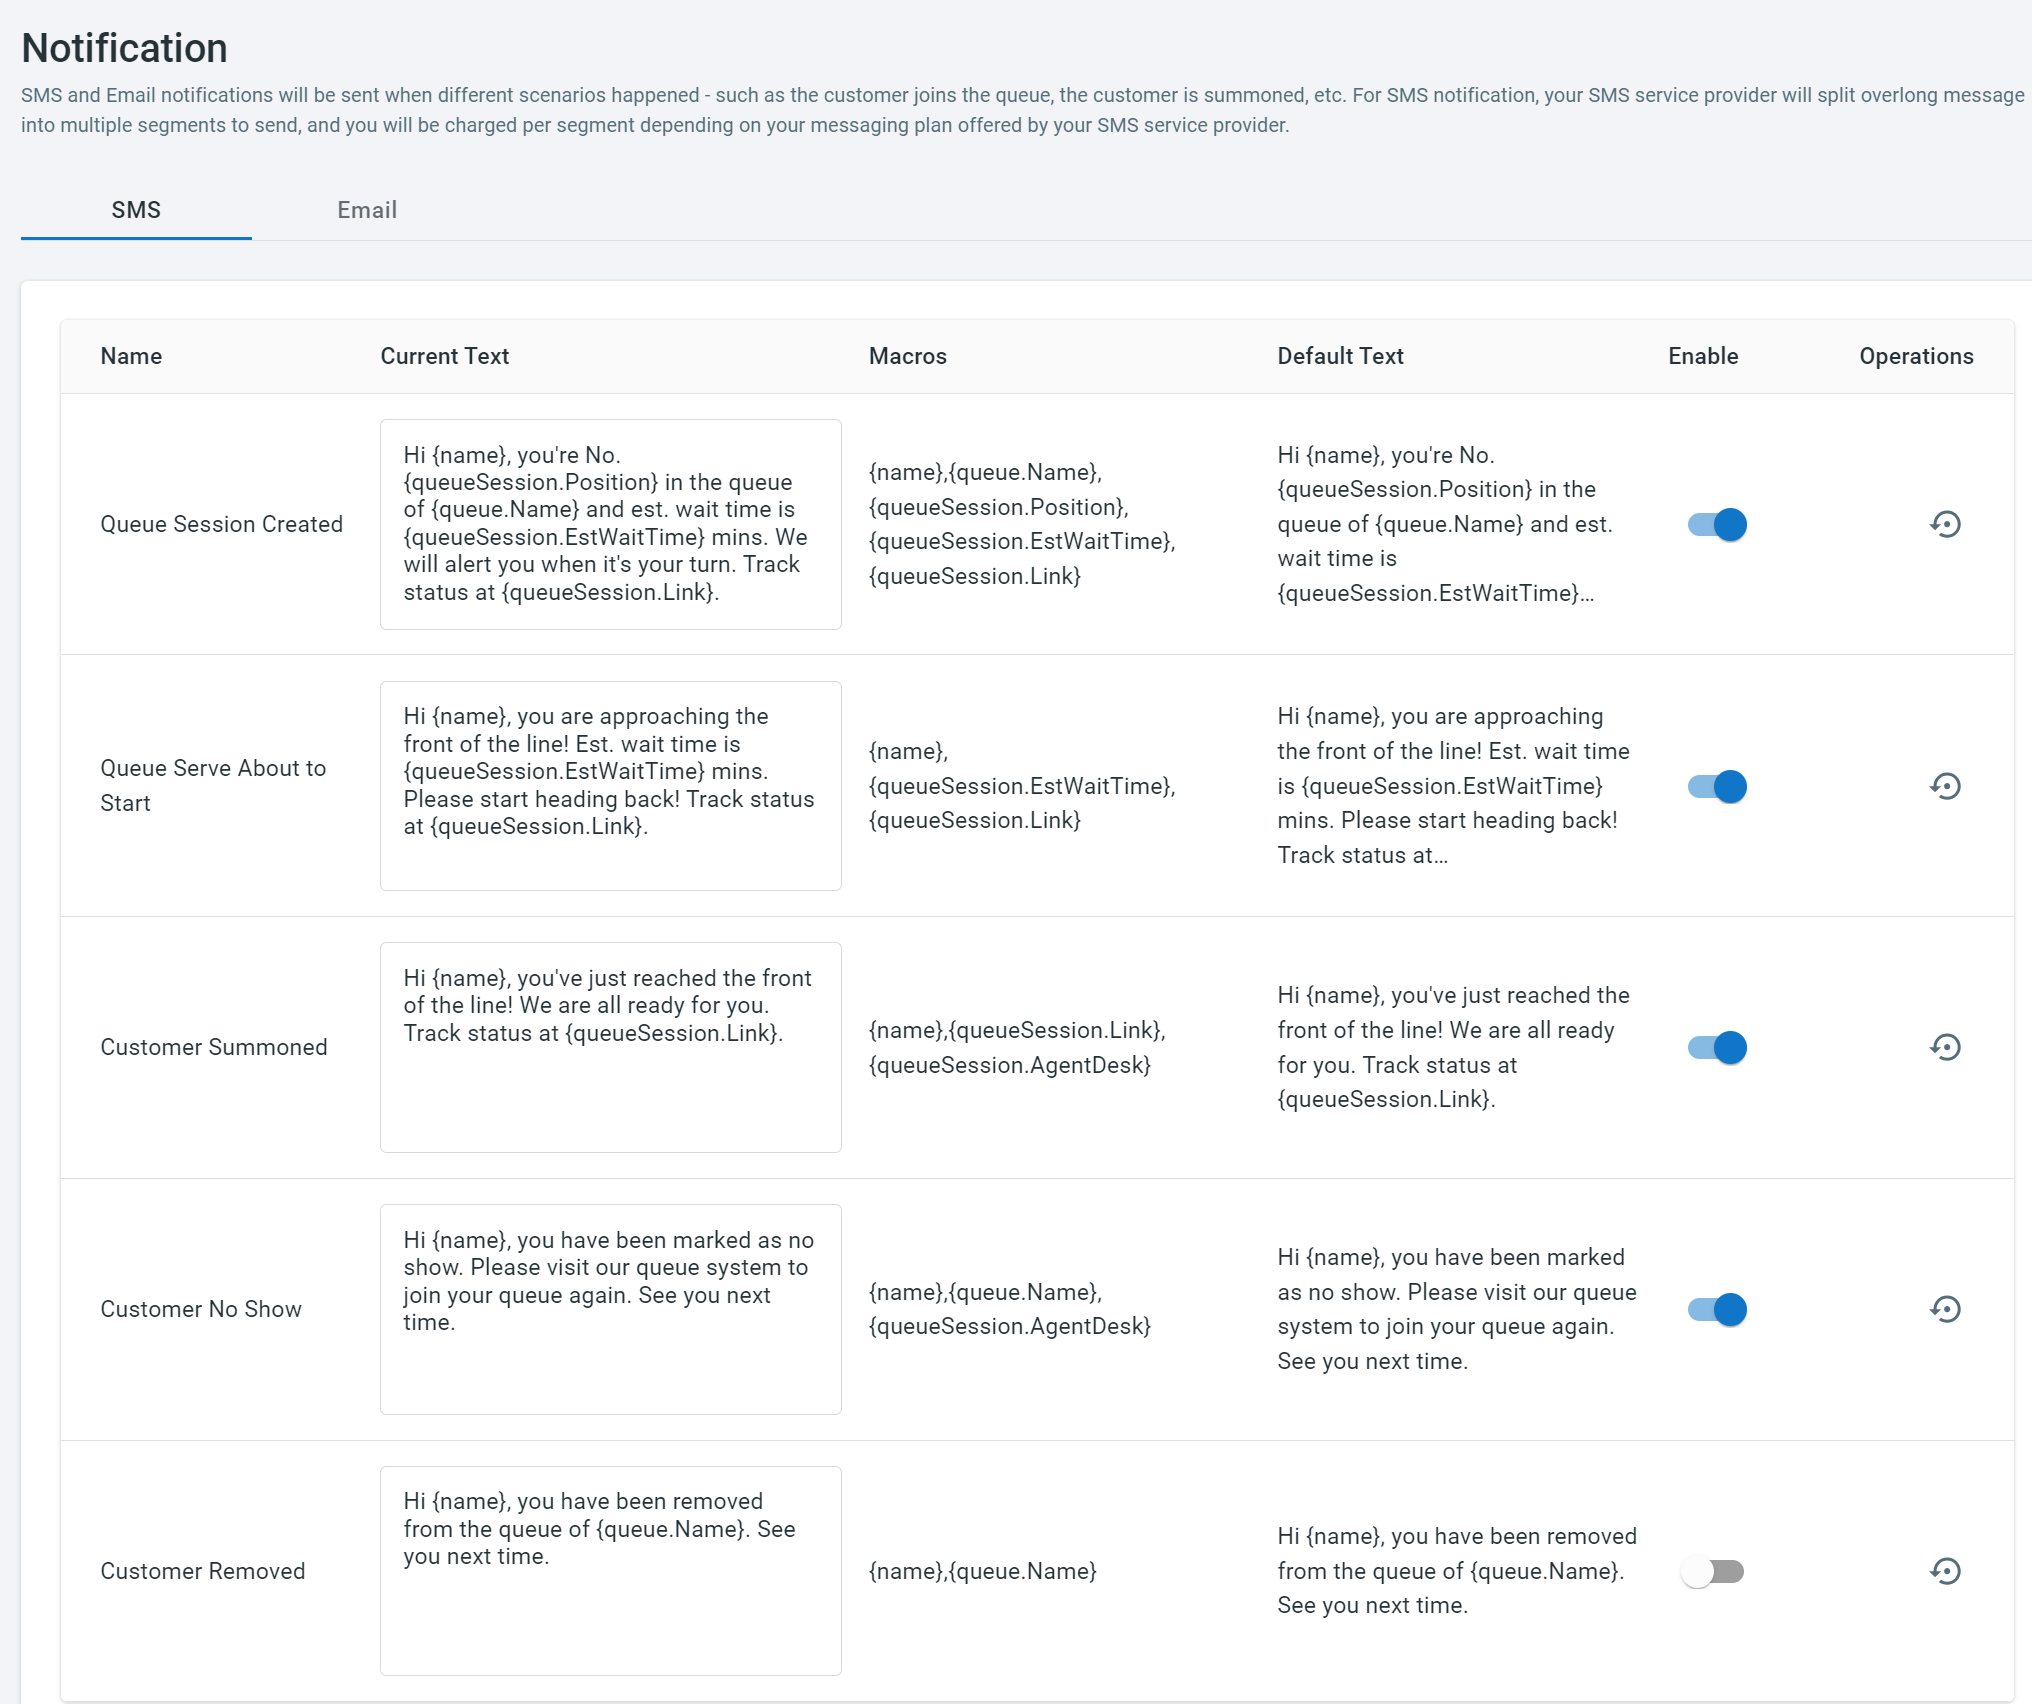
The Comm100 Queue Management system allows you to send SMS and email notifications to customers when certain events happen, for example, when the queue session is about to start. Comm100 provides the notification sample for the following occasions, which you can customize according to your needs.
- When the customer joins the queue successfully
- When the customer in queue is about to reach the front of the line in ten minutes
- When the customer is summoned
- When the customer is marked as a no-show
- When the customer is removed from the queue
To customize the notification messages to customers, follow these steps:
- On the Comm100 Control Panel, navigate to Queue > Queues > Notification.Note: If you have multiple queues, make sure to choose the correct one from the drop-down list.
- On the Notification page, modify the notification message based on your needs.Note: The notifications contain dynamic information which will be replaced by the actual value when sent to customers. For example, {Name} will be replaced by the customer's actual name.
- Click Save.
Connect Your SMS Account
To send SMS notifications, you need to connect your SMS account to the queue system. Comm100 supports Twilio accounts only.
To connect your Twilio account to the Queue Management system, follow these steps:
- On the Comm100 Control Panel, navigate to Queue > Settings > SMS Provider.
- Provide your Twilio Account SID, Auth Token, and Phone Number. You can click the link to learn where to find the information.
- Click Save.


