The Comm100 Bot-to-Bot Transfer allows you to transfer chats from one Chatbot to another Chatbot or Task Bot to another Chatbot. When a chat is transferred from one Bot to another Bot, the first Bot leaves the chat as one chat can be handled by one Bot at a time. The second Bot launches with its Greetings Messages.
You can use this feature to transfer chats across departments and handle chats when no agents are online.
Advantages of Bot-to-Bot Transfer
The Bot-to-Bot transfer feature has the following advantages:
- You can transfer a chat from a Chatbot in one department to a Chatbot in another department.
For example, if a chat lands up with your sales Chatbot and is a support query, you can transfer the chat to a support Chatbot. - You can transfer a chat to a new Chatbot when a human agent is unavailable.
For example, if your Agents log off after their shifts and a chat land up, it can be handled by the Chatbot.Note: You can only transfer chats between Bots and not from a human to a Bot.
Step by Step Instructions
You can use the Bot-to-Bot transfer feature from the flow builder area while creating Answers of Intents for Chatbot or Task Bot.
To use Bot-to-Bot transfer, follow these steps:
- Log in to your Comm100 Control Panel.
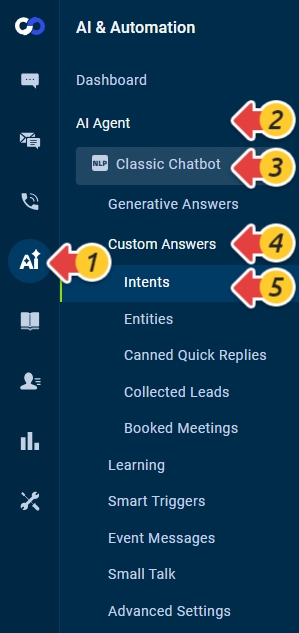
- From the left navigation menu, go to AI & Automation > AI Agent > Custom Answers > Intents. If you have multiple AI Agents, make sure to choose the correct one from the drop-down list.
- On the Intents page, choose an intent, or click New Intent to create a new one.
- On the New Intent page, scroll down to the Answers section.
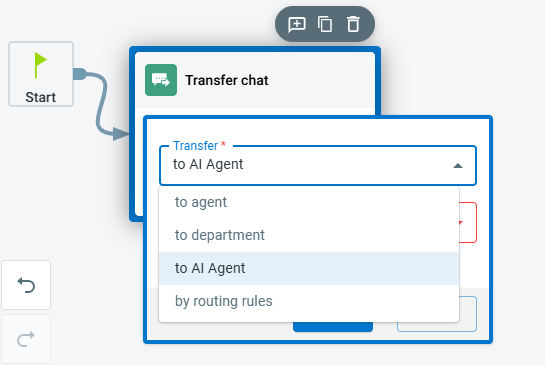
To learn more about creating Intent Answers, see this article. - Expand the Action menu, scroll down to the Flow Operations section, and drag the Transfer chat action card to the Answers flow builder area.
- Click Edit Transfer Info, a new popup appears.
- In the new popup,
- From the Transfer drop-down list, select the to AI Agent option
- Choose a chatbot from the list.
- Click OK.
- Click Save.
Bot-to-Bot transfer History, and Reporting
You can now see the conversation handled by the last Bot in History and the reports and ratings of the last Bot that handled a chat.
History: All Bot-to-Bot chat transfer details appear in the History section of the Control Panel. To view the details of Bot-to-Bot transfer chats, navigate to Live Chat > History > Chats.
On the Chats page, you can do the following:
- You can view all Chatbots' names in the Chats table, separated by a comma for a given chat.
- You can filter chats by any Chatbot in the Agent field.
- You can see each Chatbots' name in the Transcript.
- When a chat is transferred to another Chatbot X, you can see "{Chatbot X} had joined the chat " in the place when the transfer happened in the Transcript.
Reporting: Whenever there is a Bot-to-Bot chat transfer, the reports and ratings apply to the last Chatbot. To check the details for reports and ratings, navigate to Reporting > AI Agent.
To learn more about reading the Chatbot repots, see this article.
If you need help in using the Bot-to-Bot transfer, you can chat with us!


