While customers may expect a quick response, it is equally important to reach out to them at an appropriate time to ensure better engagement. If you are providing customer support across different time zones or aiming for a strategic follow-up, scheduling ticket replies gives you greater control over your communication time.
By scheduling a ticket reply, agents can save a draft reply and choose a future time to send it, so that their replies can arrive at the right time.
- Ticket scheduling is available in the Ticketing & Messaging Ultra and Omnichannel Ultra plans. To learn more about Comm100 product packages, visit here.
- Agents can only schedule ticket replies when responding via email. When creating new tickets or responding via other channels such as SMS, they cannot use the schedule option.
This article introduces how to use the ticket scheduling option in Comm100 Ticketing & Messaging.
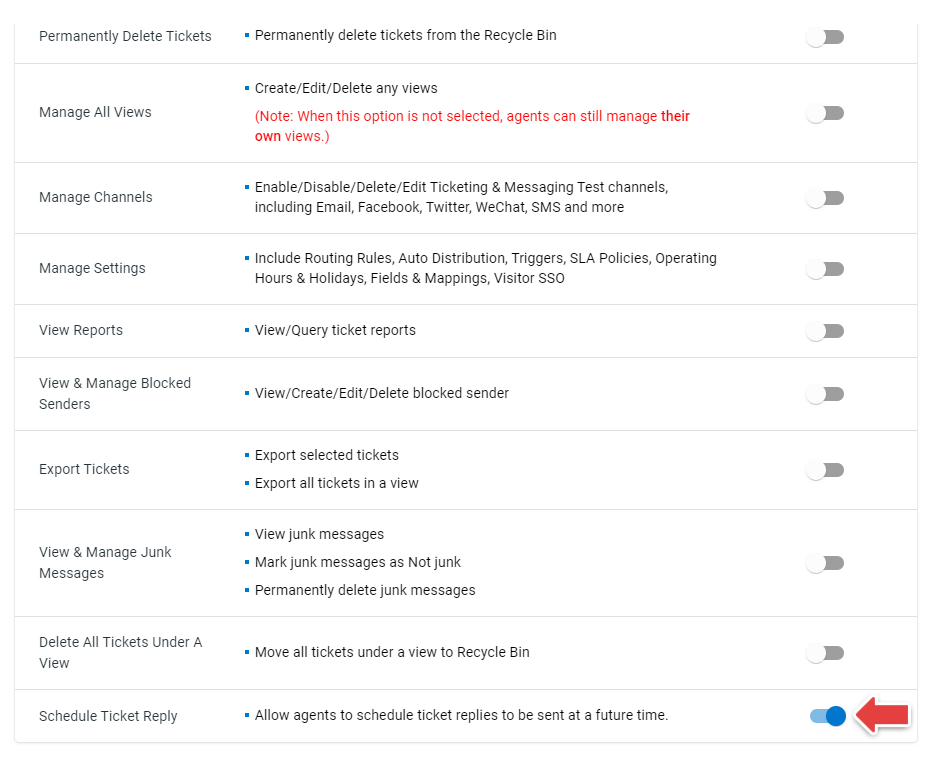
Enable Agents’ Permission
Agents must have the Schedule Ticket Reply permission to schedule replies. The permission is disabled by default. To enable agents’ permission, follow these steps:
- Log in to your Comm100 Control Panel.
- From the left navigation menu, go to Global Settings > People > Agents. A list of agents is displayed on the Agents page.
- Locate the agent that you want to enable or disable the permission for, and click the gear icon in the Permissions column.
- In the Permission Settings drawer, click the Ticketing & Messaging tab, and turn on the Schedule Ticket Reply permission.
- Click Save.


Schedule Email Replies
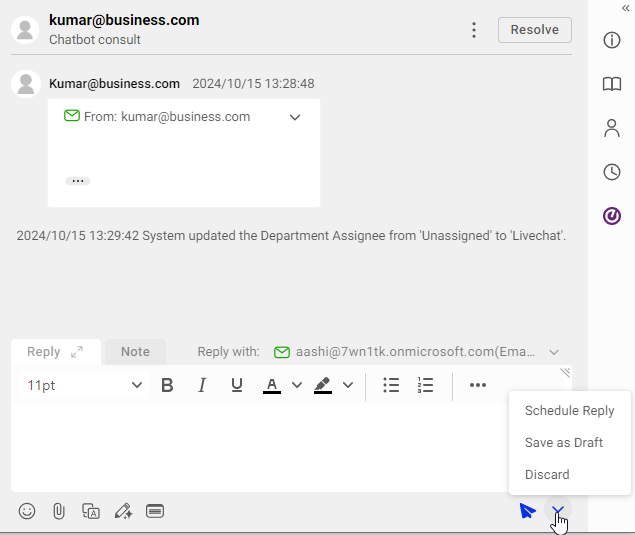
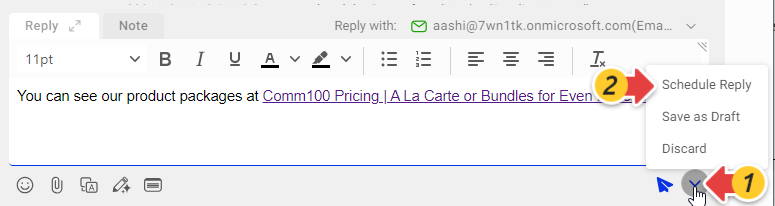
With the Schedule Ticket Reply permission, agents can use the Schedule Reply option when responding via the Email channel.
To schedule an email reply, follow these steps:
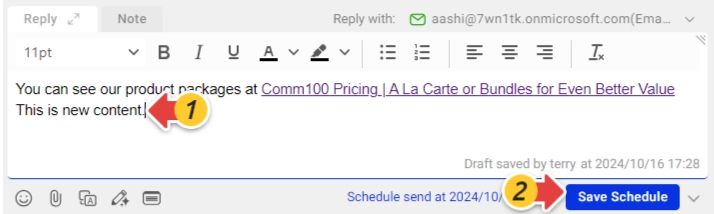
- In the ticket replying area, compose the email content.
- Click the arrow icon in the bottom right, and choose Schedule Reply.
- Select a predefined time from the options, or select Custom Time and set the date and time.
- Click Save Schedule.
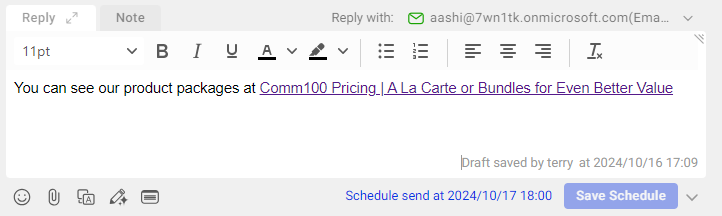
Once an email is scheduled, you can view the date and time when the email will be sent.
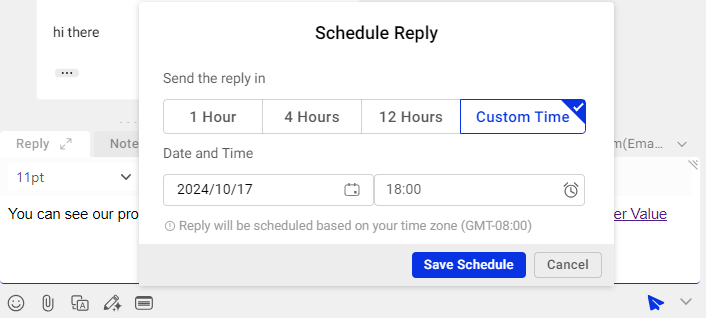
- Replies can be scheduled for a maximum of 60 days.
- One ticket can only have one scheduled reply. You can still edit or cancel the schedule before the scheduled time.
- The date and time are based on the time zone of the agent who made the schedule. When other agents check the ticket, they can see the time converted to their own time zone.
The following settings apply to the scheduled replies:
- If the customer replies to the ticket before the scheduled send time, the schedule will be cleared, and the reply will be saved as a draft in the system.
- If the ticket is resolved or deleted before the scheduled time, the schedule will be cleared, and the reply will be saved as a draft in the system.
- As one ticket can only have one draft reply, if you change to a Non-email account to reply with, you need to cancel the schedule first.
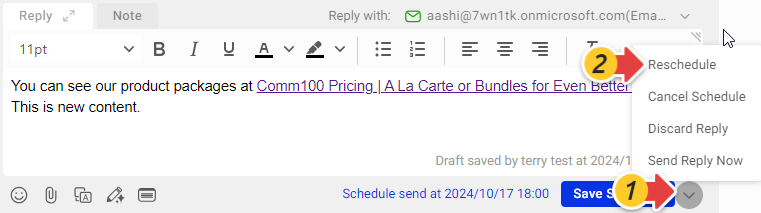
Operations for Scheduled Replies
For scheduled replies, agents can perform the following operations:
- Edit the reply content and save it as a new draft. To edit the reply, modify the text in the replying area, and click Save Schedule.
- Choose a new time to send the draft reply. To reschedule the reply, click the arrow icon, choose Reschedule, and choose the time and date.
- Cancel the schedule and keep the draft reply. To cancel the schedule, click the arrow icon, and choose Cancel Schedule. Afte canceling the schedule, the reply will be saved as a draft in the system.
- Discard both the schedule and the draft reply. To discard the schedule and the reply, click the arrow icon, and choose Discard Schedule.
- Send the scheduled reply immediately. To send the reply, click the arrow icon, and choose Send Reply Now.
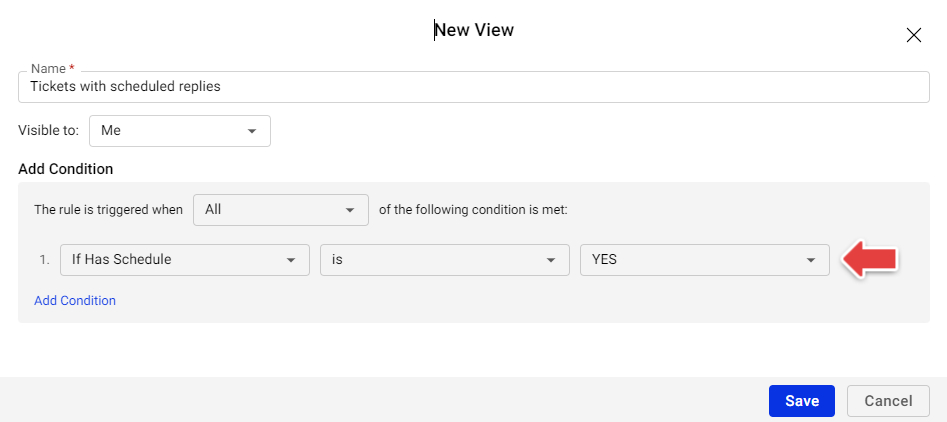
- Create a View to group all the tickets that have scheduled replies. To create the view, use the If has schedule rule as the condition.
To learn more about views in Ticketing & Messaging, see this article.