AI Agents can generate responses through analysis of the extensive Knowledge sources you provide using Large Language Models (LLMs). These responses are not predefined or stored in a database; they are automatically generated to provide coherent, informative, and contextually relevant outputs that closely resemble the source data.
- Topic answers and Knowledge contents are the primary sources for the AI Agent to locate suitable responses or perform proper actions. When both Topic and Knowledge are equipped with valid configurations, the AI Agent will provide responses by matching a Topic as a priority, and try to generate an answer by using Knowledge contents when no Topic matches.
- Our system uses AI Replies to measure the usage of AI Agent features. Every time the AI Agent responds, it consumes the AI Reply volume. To learn more about how AI Agent features consume AI replies, see this article.
Knowledge serves as the information base that AI Agents can fetch support content from and then generate an answer. Comm100 AI Agent supports the following types of Knowledge Contents:
- Online webpages. You can provide an accessible URL for the AI Agent to retrieve public webpage resources.
- Local files. You can upload your local files (DOCX, HTML, MD, PDF, or TXT files) for the AI Agent to use.
- Knowledge Base articles. You can add your Knowledge Base articles from Comm100, connected Confluence Cloud, or ServiceNow account for the AI Agent to use.
- Cloud files from SharePoint Online and Google Drive. You can add your files stored on SharePoint Online and Google Drive for the AI Agent to use by connecting your account with Comm100.
- Snippets. For some quick Q&A pairs or customer-specific notices that you don’t want to publish on your public help center, you can add Snippets to improve the AI Agent's answer coverage
Input a Webpage URL
To use online public webpages as the Content, follow these steps:
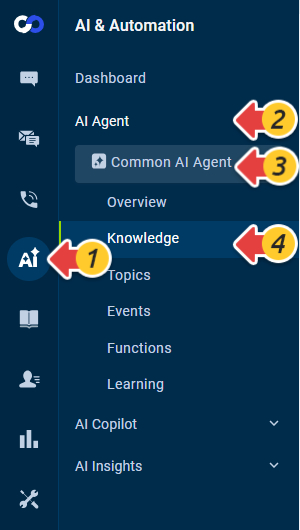
- On the Comm100 Control Panel, go to AI & Automation > AI Agent > Knowledge. If you have multiple AI Agents, make sure to choose the correct one from the drop-down list.
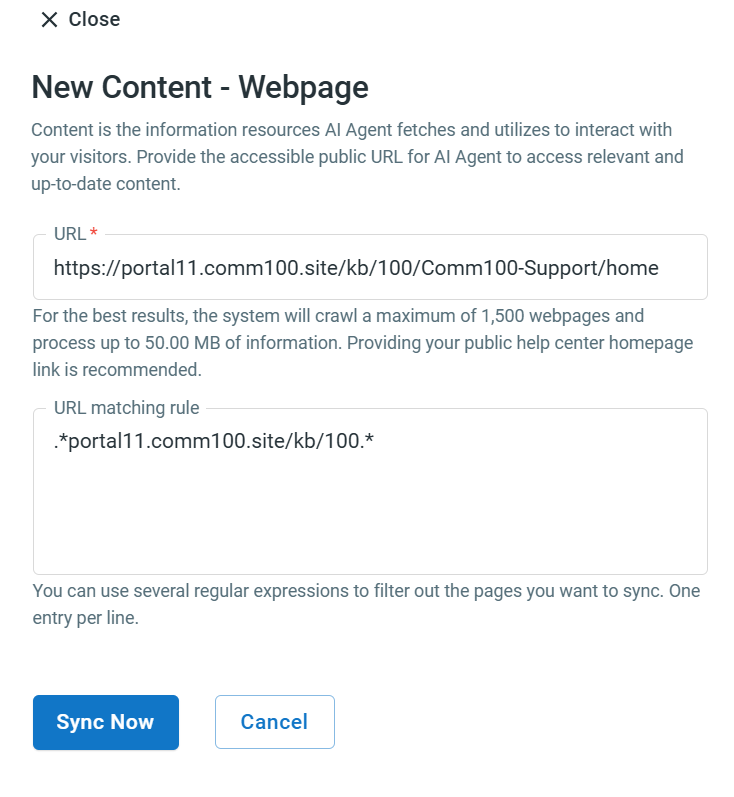
- Click New Content and choose Webpage. The New Content - Webpage drawer appears from the right.
- Input an accessible public URL for the AI Agent to access the content. You can use regular expressions to filter out the webpages.Note:
- For the best results, providing your public help center homepage link is recommended.
- Avoid entering a single page URL, such as https://www.yourcompany.com/index.html, as this will only retrieve that particular page.
- The configured URL is set as the starting page. The AI Agent crawls and imports all the webpages starting with the URL you enter.
- The URL matching rule enables you to filter out the pages you wish to sync. The setup requires a basic understanding of regular expressions. You can consult with your technical team or access basic information by clicking here.
- When no URL matching rule is defined, all HTML webpages within the URL path are imported.
- When a URL matching rule is defined, the AI Agent imports the webpages that match the rule, regardless of whether they are within the URL path or not.
- With multiple rules in place, a webpage is imported as long as it matches one of the defined rules.
- Click Sync Now. The system starts to fetch valuable information based on the content available on the website and shows the processing status.Note: For each source, the total content size cannot be more than 50MB. The crawling task stops once this number is reached and more pages are ignored.
- (Optional) To cancel a syncing task waiting in line or in progress, click Manage Resources, then delete the task from the resource list.

Upload Local Files
To upload your local files as the Content, follow these steps:
- On the Comm100 Control Panel, go to AI & Automation > AI Agent > Knowledge. If you have multiple AI Agents, make sure to choose the correct one from the drop-down list.
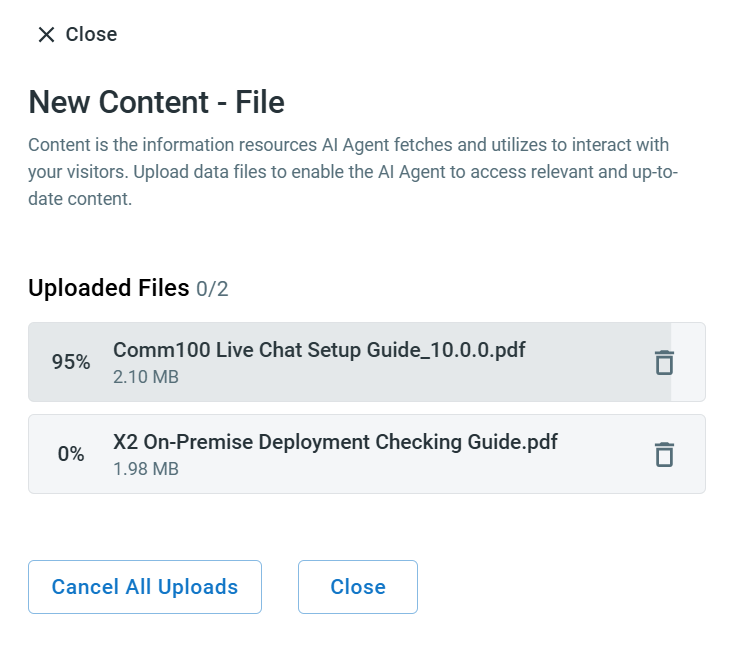
- Click New Content and choose File. The New Content - File drawer appears from the right.
- To upload your files, drag and drop your files into the file box or click to choose your files. During the upload process, you can view the progress of uploading.
- (Optional) To cancel an uploading task, click the Delete button for a single file, or click Cancel All Uploads to cancel the entire task.
- Supported file formats: DOCX, HTML, MD, PDF, and TXT.
- The maximum size for a single file to upload is 20.00MB.
- During the file uploading process, if you choose Cancel All Uploads, all the files in this task are removed, no matter whether the file has been uploaded or not.
Add Knowledge Base Articles
If you are using Comm100 Knowledge Base, Confluence Cloud or ServiceNow, you can add the Knowledge Base articles from the connected accounts for the AI Agent to use.
- If your site has Comm100 Knowledge Base subscription, you can use the articles directly by selecting it as the KB product.
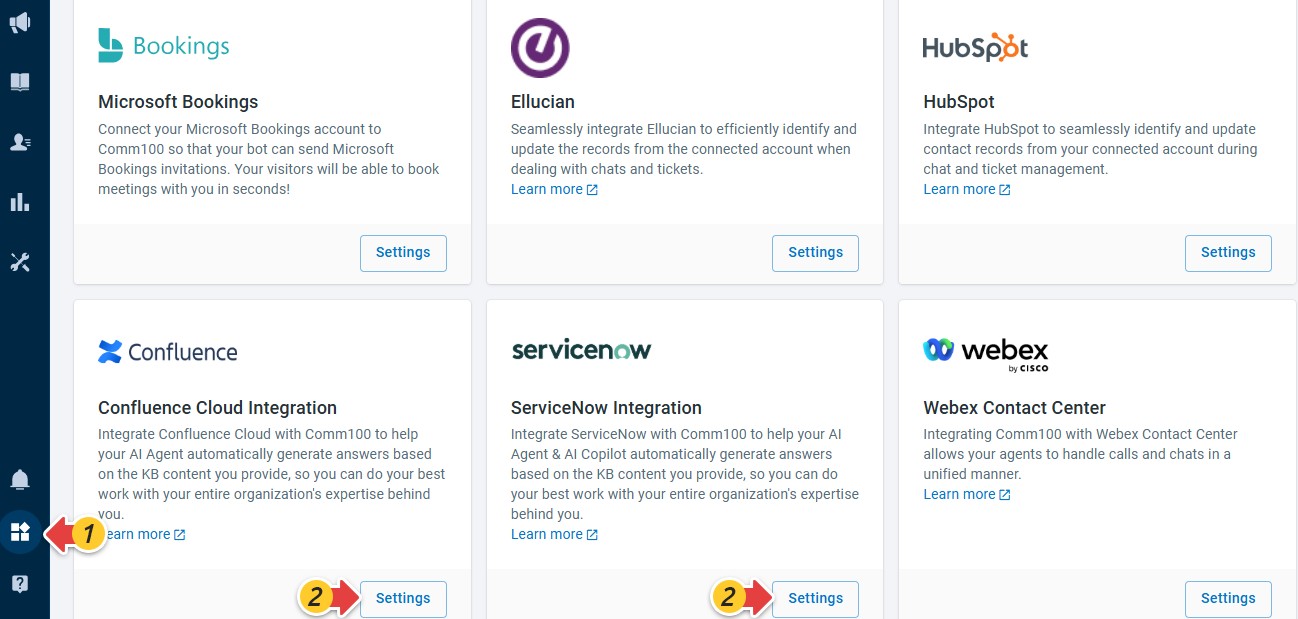
- To use Confluence Knowledge Base articles, you need to connect your Confluence account from Apps & Integrations > Confluence first.
- To use ServiceNow Knowledge Base articles, you need to connect your ServiceNow account from Apps & Integrations > ServiceNow first.
To add Knowledge Base articles, follow these steps:
- On the Comm100 Control Panel, go to AI & Automation > AI Agent > Knowledge. If you have multiple AI Agents, make sure to choose the correct one from the drop-down list.
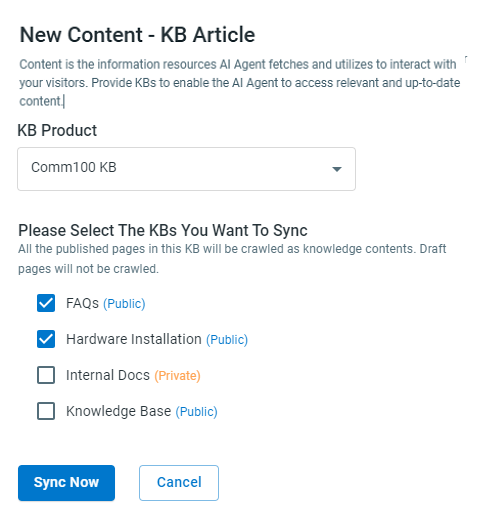
- Click New Content and choose KB article. The New Content - KB Article drawer appears from the right.Note: For Comm100 KB, if you have defined your branding name from the Comm100 Partner Portal, the product name will be consistent with your branding name in the XX KB pattern.
- Choose Comm100 KB, Confluence Cloud or ServiceNow from the KB Product dropdown list, then choose the KBs or spaces that are synced from Comm100 KB, your Confluence Cloud or ServiceNow account.Note:
- All the published pages in the selected KBs or spaces are imported. Draft pages are ignored.
- All the text-based elements are imported. Images, medias, and files are ignored.
- For Comm100 Knowledge Bases, updates are auto-synced in real time. For Confluence KB spaces, updates are automatically synced every 12 hours. For ServiceNow articles, the system auto-syncs updates every 24 hours. You can also manually sync the KB at any time to retrieve the latest updates.
- Click Sync Now. The system starts to import knowledge base articles from the selected spaces and shows the processing status.
- (Optional) To cancel a syncing task waiting in line or in progress, click the gear icon, then delete the task from the KB resource list.
Add Cloud Files
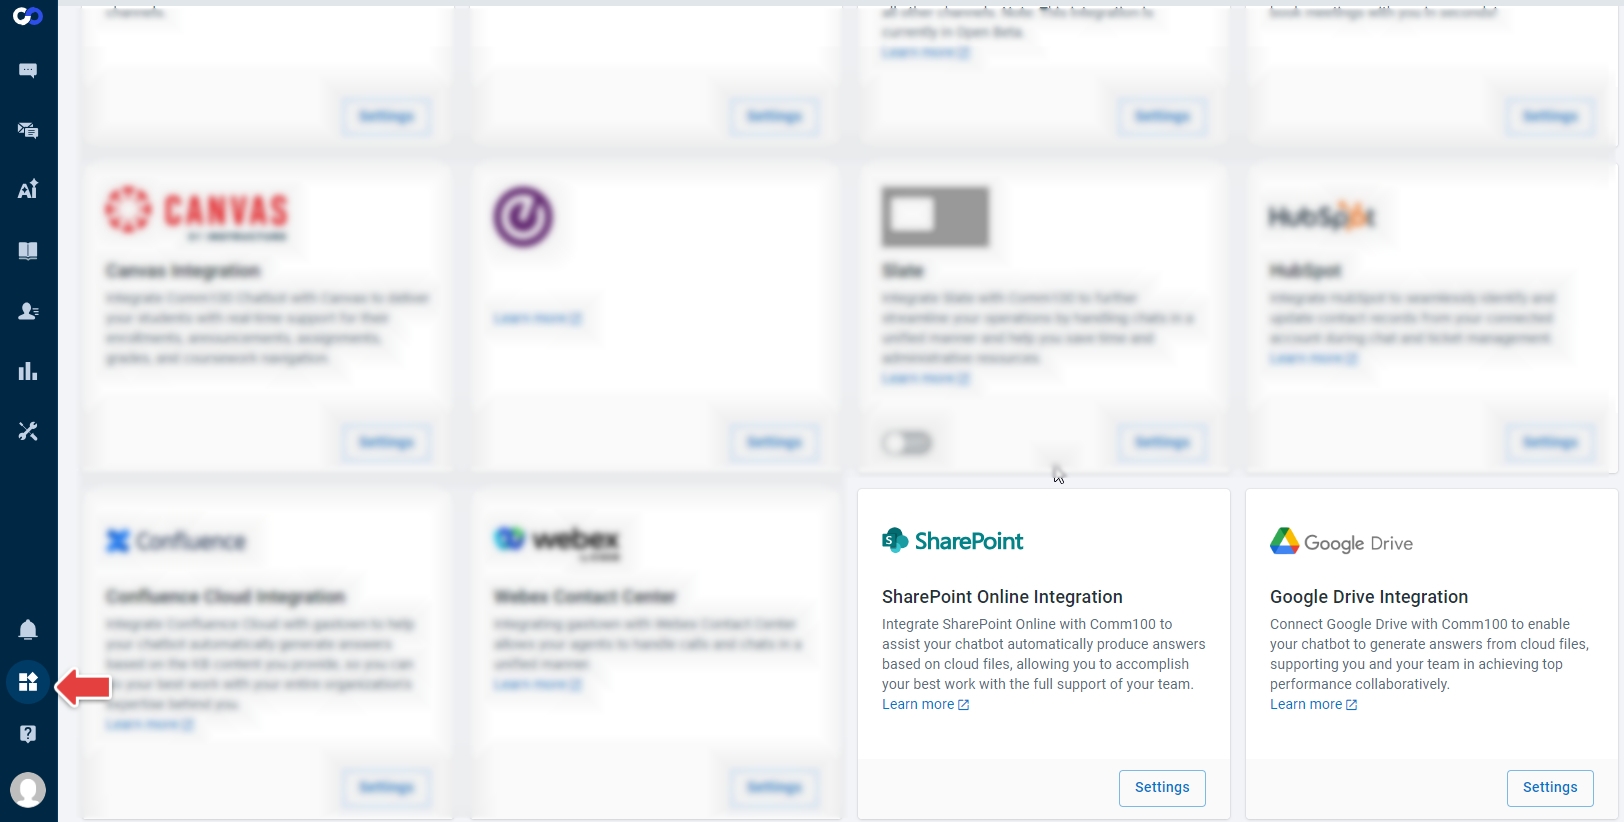
To use files stored on SharePoint Online or Google Drive as the Content, you need to connect your SharePoint or Google Drive account from Apps & Integrations first.
After connecting your SharePoint Online or Google Drive account, follow these steps to add the files:
- On the Comm100 Control Panel, go to AI & Automation > AI Agent > Knowledge. If you have multiple AI Agents, make sure to choose the correct one from the drop-down list.
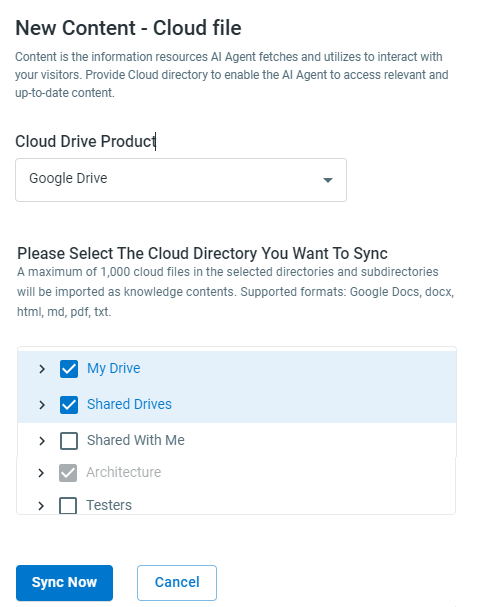
- Click New Content and choose Cloud file. The New Content - Cloud file drawer appears from the right.
- Choose the cloud directories that are synced from your connected account. If you have connected both SharePoint and Google Drive accounts, you need to choose the cloud drive product first.
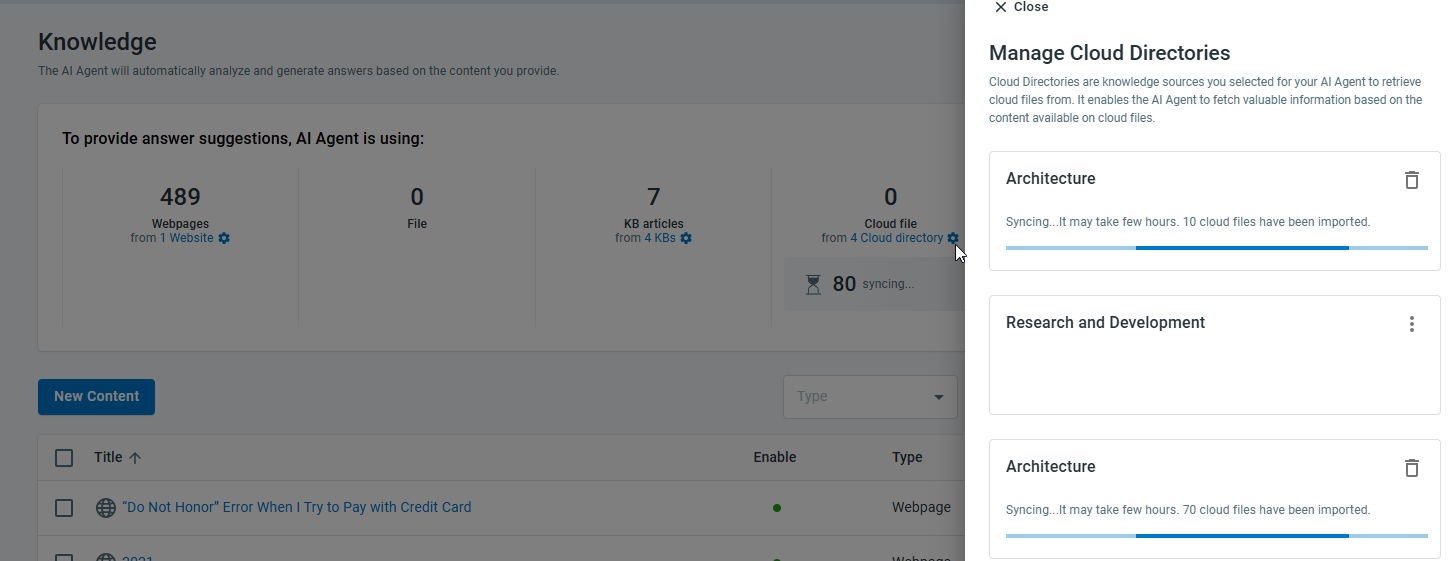
- Click Sync Now. The system starts to import files from the selected directory and shows the processing status. You can click the gear icon to view the status in real time
- (Optional) To cancel a syncing task waiting in line or in progress, click the gear icon, then delete the task from the directory list.
- All the supported files in the selected directories are imported. Supported file formats: Google Docs, DOCX, HTML, MD, PDF, and TXT.
- After the cloud directories are added, the cloud files from the directories are auto-updated every 12 hours. You can also manually sync the directories for the latest updates.
- If a directory is deleted from your connected account after being synced to Comm100, the directory still exists as an item in the Contents list, but the sync will fail at next sync.
Add Snippets
For small pieces of information that you do not want to publicly show on your website, you can add Snippets for the AI Agent to use. Snippets can be edited or deleted quickly from the Control Panel.
To add snippets as the AI Agent's Knowledge sources, follow these steps:
- On the Comm100 Control Panel, go to AI & Automation > AI Agent > Knowledge. If you have multiple AI Agents, make sure to choose the correct one from the drop-down list.
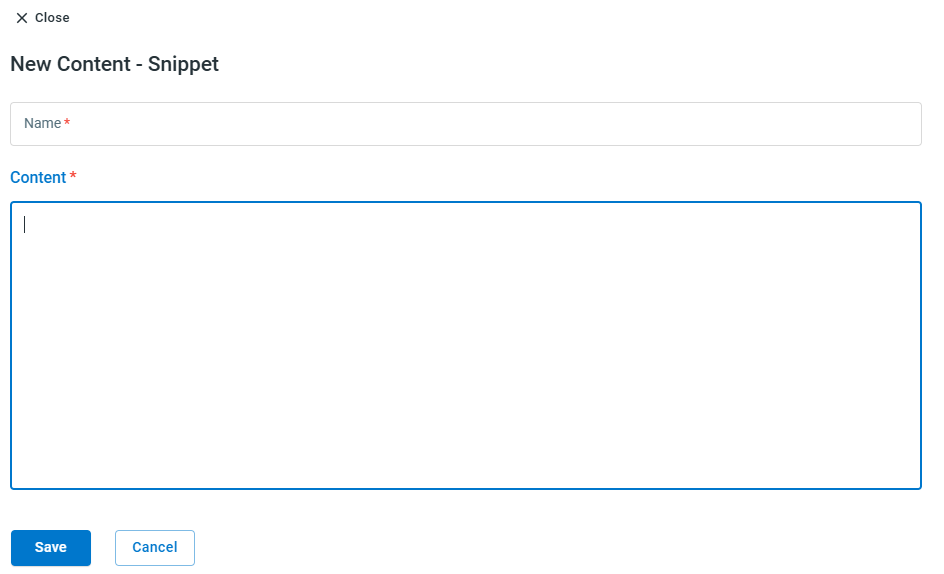
- Click New Content and choose Snippet. The New Content - Snippet drawer appears from the right.
- Input the name and content.
- Click Save. The snippet appears in the content list after being saved successfully.
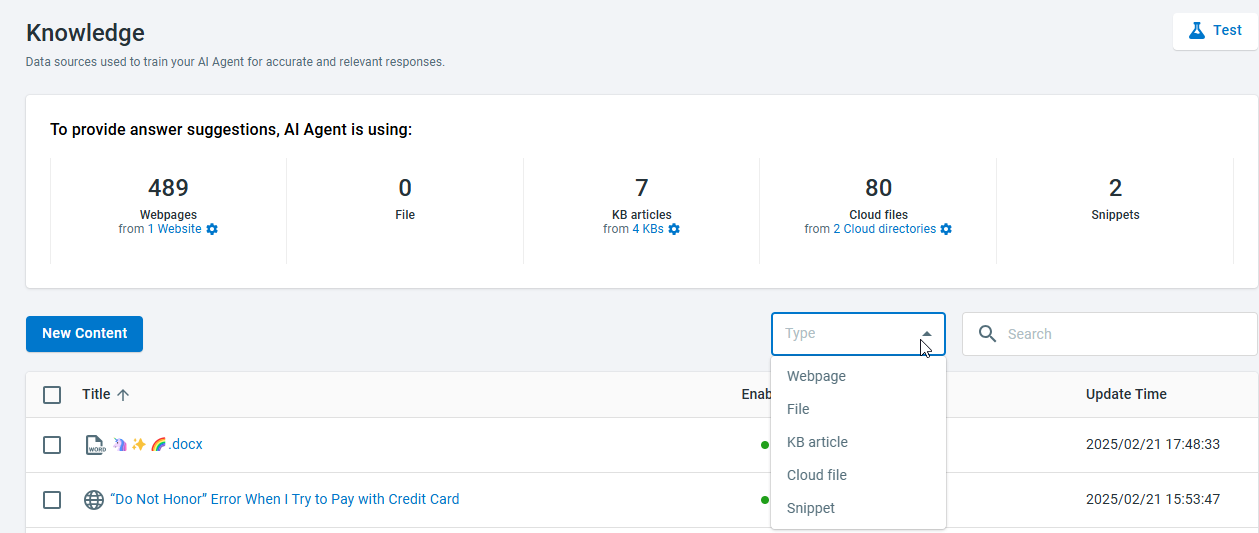
- Filter the content list by choosing the content type from the dropdown list or by search keywords.
- Enable or disable the contents. All the contents are enabled when being added to the Comm100 system. For outdated contents, you can disable them to stop the AI Agent from using the information. To disable contents, select the items in the list, then click Disable on the top toolbar.
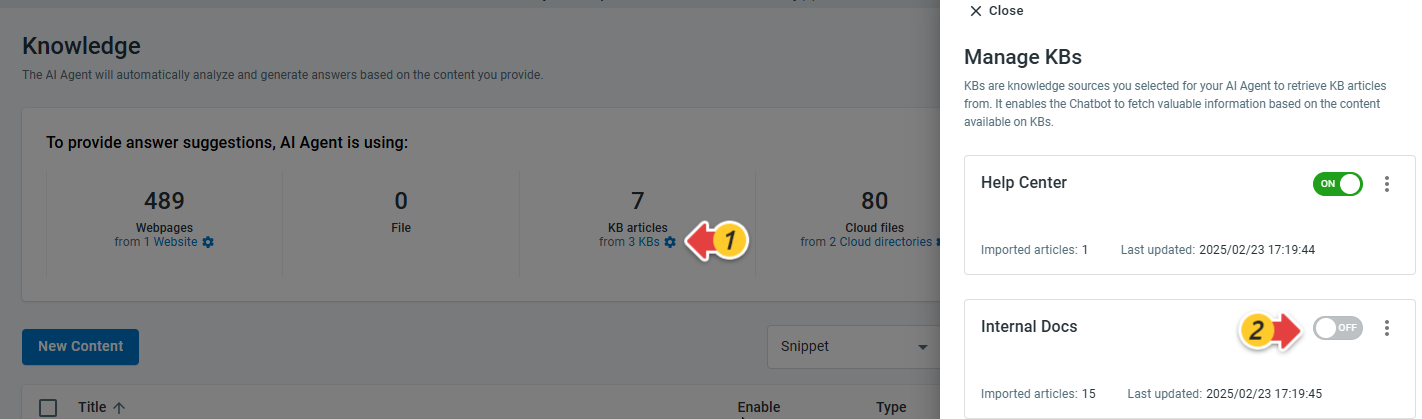
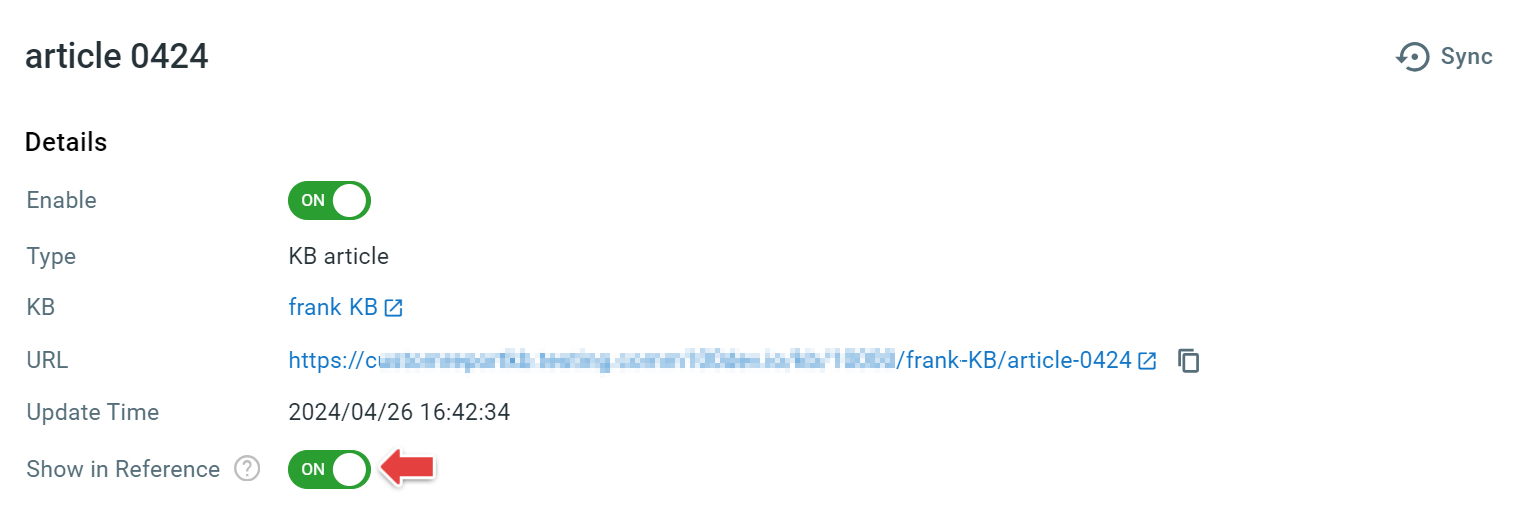
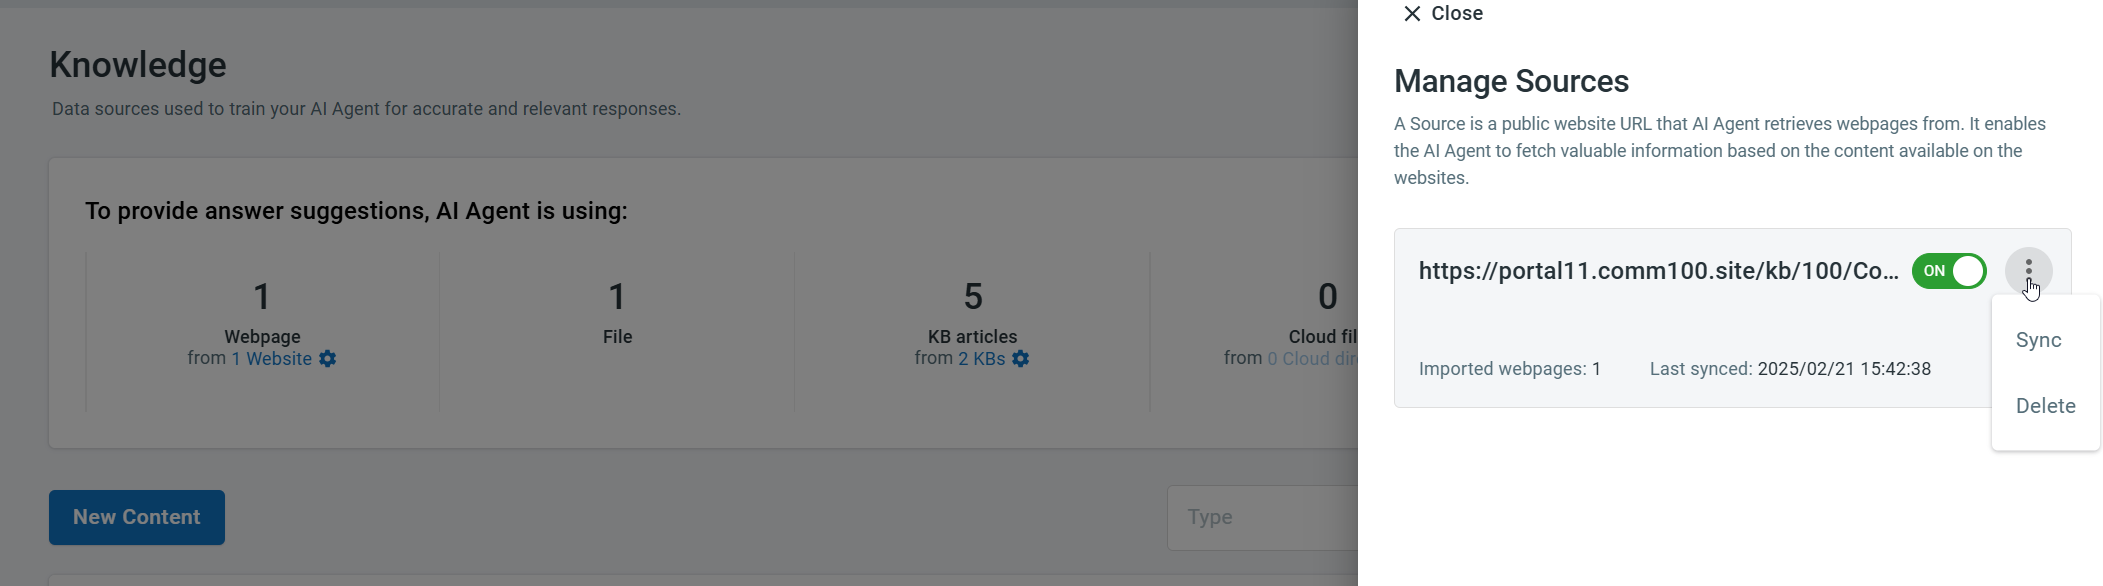
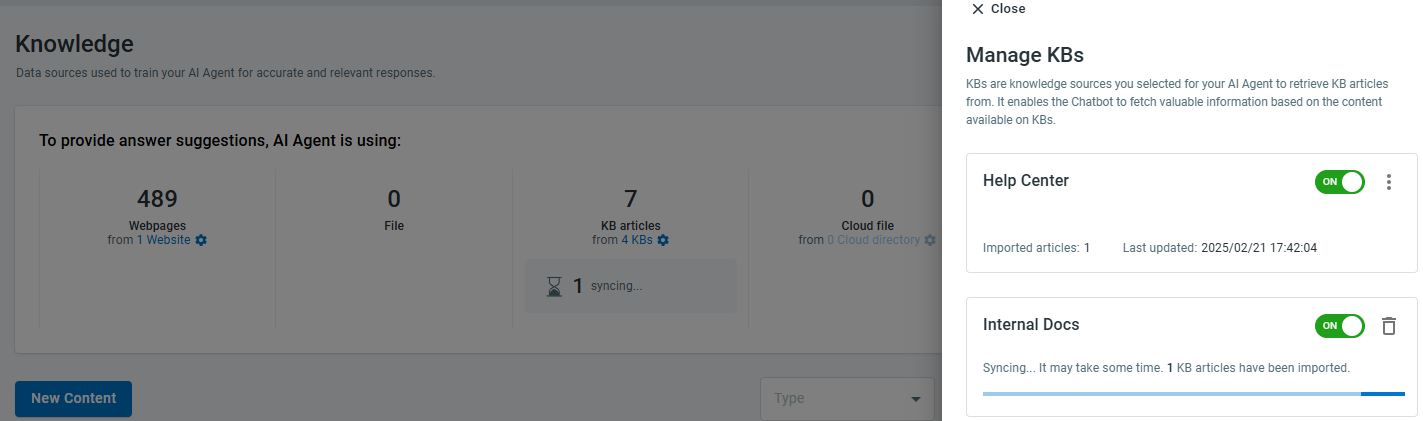
For webpages, KB articles, and cloud files, you can disable all the contents from a source URL, KB, or cloud directory. To disable a source URL, KB, or cloud directory, click the gear icon under the content type, then turn off the enable toggle on the Manage Sources (or Manage KBs / Cloud Directories) drawer that appears.Note: Snippets cannot be disabled. You can delete a snippet to remove the information. - Show or hide the content in reference when the AI Agent provides an answer. By default, when the chatbot generates an answer based on a specific content, the content appears in the reference part in the AI Agent's answer. For file type of contents, visitors can click the reference link to view the details.
To hide contents in reference, select the contents in the list, then click Hide in Reference on the top toolbar.
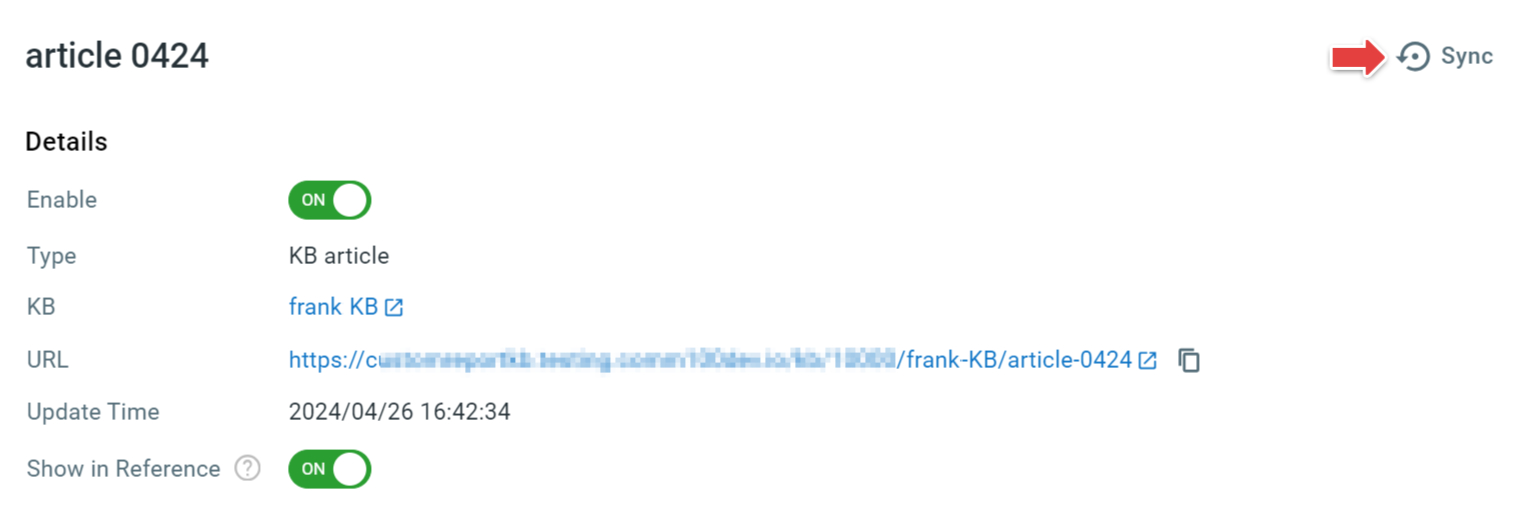
You can also hide an individual content item by clicking it in the list, then turn off the Show in Reference toggle.Note: The Snippet type of Content will not show in the reference part in the AI Agent's answer. - Sync contents for the AI Agent to retrieve updates. When webpage URLs, Knowledge Base articles, and cloud files are added, the system syncs the Contents for the AI Agent to use. The system sync happens in fixed intervals thereafter. If you’ve made substantial updates, you can manually click Sync to have the system start syncing newly updated contents immediately.
You can sync an individual webpage, Knowledge Base article, or cloud file by clicking it in the list, then click Sync on the details drawer that appears.
To sync all the contents from a source URL, KB, or cloud directory, click the gear icon on the Generative Answers page, click the three dots icon and choose Sync on the Manage Sources (or Manage KBs / Cloud Directories) drawer that appears.Note:- For public webpages, the source sync typically takes few hours as the system retrieves all webpages under the provided public URL. The sync process happens every 7 days automatically.
- For cloud files and Confluence KB spaces, the sync duration depends on the size of the spaces and files. The sync process happens every 12 hours automatically.
- For ServiceNow KBs, the sync process happens every 24 hours automatically.
- For Comm100 KBs, the system auto-syncs the updates in real-time.
- Delete contents.
- To delete files or snippets, you can select them from the content list, then click Delete on the top toolbar.
- To delete webpages, KB articles, or cloud files, you need to delete the source webpage URL, KB, or cloud directory that the contents are synced from. To delete a source URL, KB, or cloud directory, click the gear icon on top of the content list, click the three dots icon and choose Delete on the Manage Sources (or Manage KBs / Cloud Directories) drawer that appears.
- To delete files or snippets, you can select them from the content list, then click Delete on the top toolbar.