- For incoming emails, only the emails sent to the Inbox folder are created as tickets. Emails that are automatically categorized into Junk or your custom folders will not be created as tickets in Comm100.
- The file attachment of type Outlook item (msg) in the email is not supported in Comm100 Ticketing & Messaging. Therefore, tickets created from these emails do not have attachments. It applies to Office 365, Microsoft Exchange, and Shared Mailbox account types.
- Office 365 account
Office 365 (also known as Microsoft 365) is a set of cloud-based applications and services provided by Microsoft, including Office, Exchange Online, and so on. A standalone Exchange Online email account is also supported. - Outlook.com account
Outlook.com is Microsoft’s free, web-based email service, and it includes both @outlook.com and @hotmail.com personal accounts. - Gmail account
A Gmail account can refer to either a free Gmail account (@gmail.com) or a business Gmail account (Google Workspace). - Microsoft Exchange account (Migrate by Dec.10, 2022)
Microsoft Exchange is an email service based on an on-premise Exchange server. A Hosted Exchange account managed by a third-party service provider is also supported. The Exchange server information is required when you add an Exchange account. Comm100 supports Microsoft Exchange server 2007 with SP1 or above.Note: Microsoft has decided to deprecate the basic authentication used by Microsoft Exchange Online, which requires customers to move from apps that use basic authentication to apps that use Modern authentication. For more information, see here. - POP3 account
Post Office Protocol 3 (POP3) is the most common email account type. You can connect your email account with POP3 and SMTP configurations. - Shared Mailbox
Shared mailboxes make it easy for a group of people in your company to monitor and send emails from a common account, such as info@comm100.com or support@comm100.com. When a person in the group replies to a message sent to the shared mailbox, the email looks like it was sent by the shared mailbox, not from the individual user.
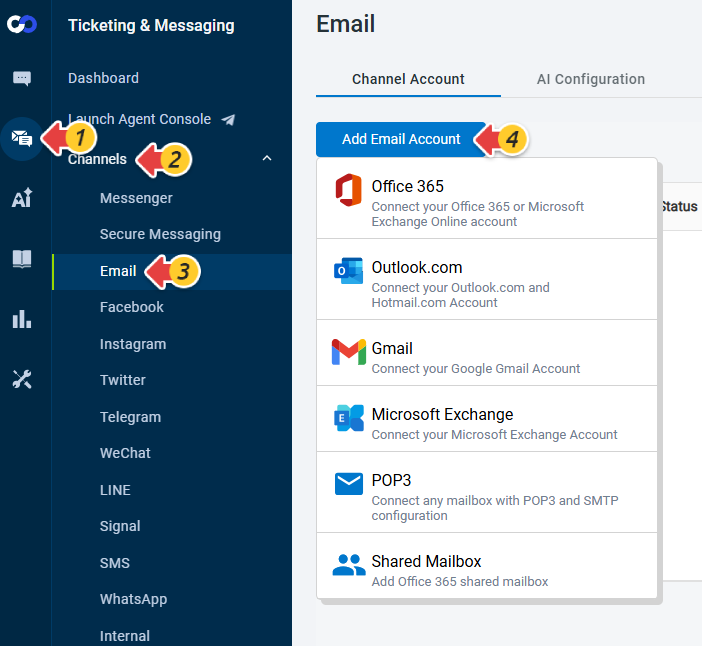
- Log in to your Comm100 Control Panel.
- From the left navigation menu, go to Ticketing & Messaging > Channels > Email.
- Click Add Email Account and choose Office 365 from the drop-down list.
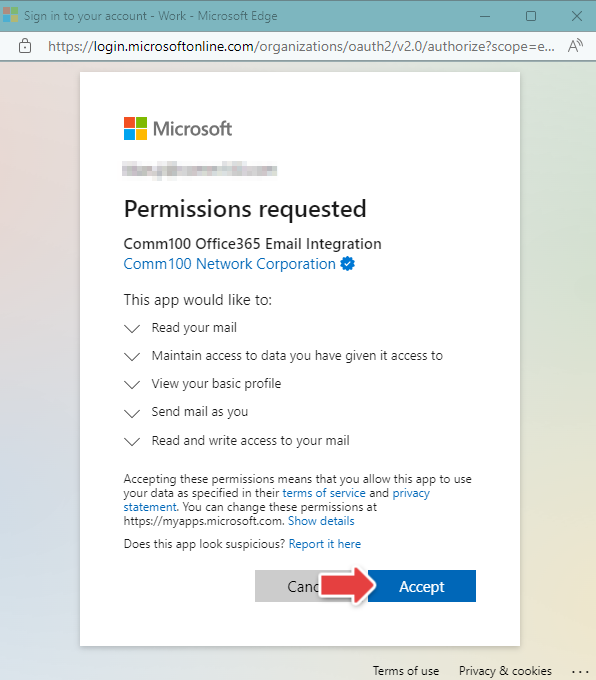
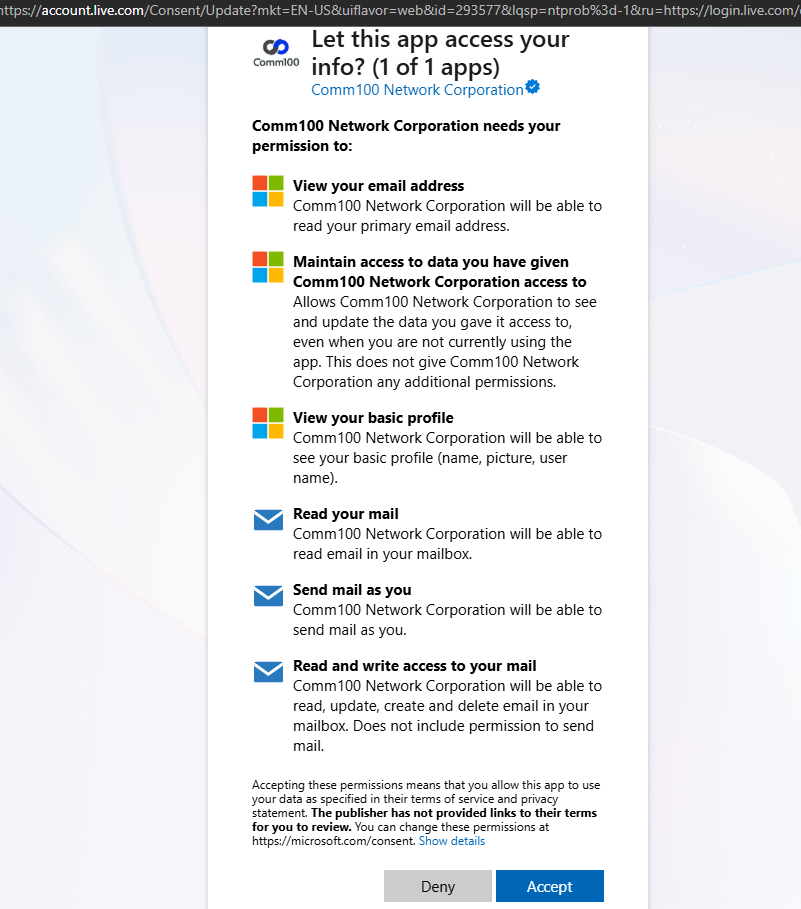
- Enter your Microsoft account and password to sign in. A permission request window appears after you sign in.
- In the Permission requested window, click Accept to grant permissions to Comm100.
Your Office 365 account is added to Comm100 after permissions are granted successfully. The added account appears in the email account list.

- Log in to your Comm100 Control Panel.
- From the left navigation menu, go to Ticketing & Messaging > Channels > Email.
- Click Add Email Account and choose Outlook.com from the list.
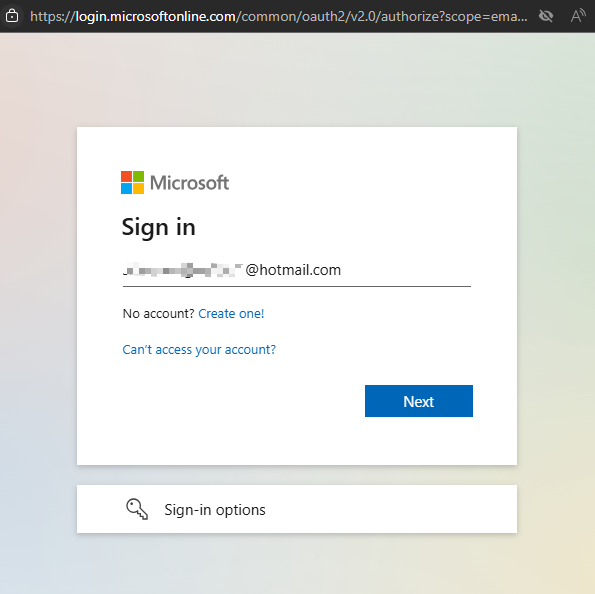
- Enter your Outlook.com or Hotmail.com email address and click Next.
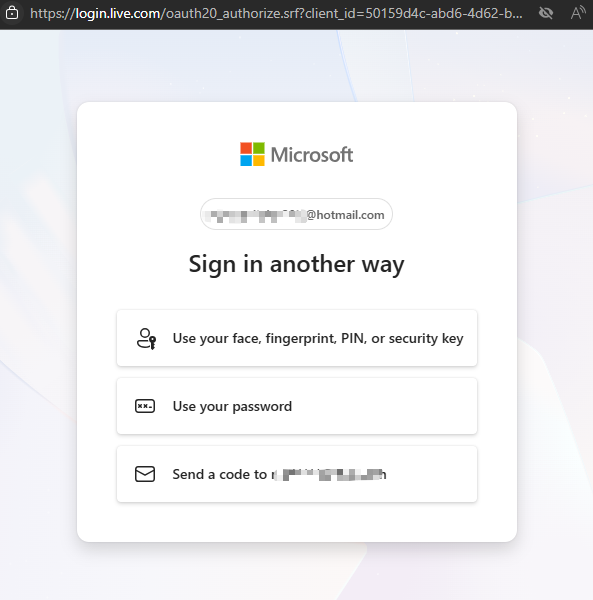
- Choose one of the available sign-in methods (three options are provided). Select the one that works best for you.
- On the access grant page, click Accept to authorize Comm100.
Your Outlook.com or Hotmail.com account is now added to Comm100 successfully. The added account appears in the email account list.
- Log in to your Comm100 Control Panel.
- From the left navigation menu, go to Ticketing & Messaging > Channels > Email.
- Click Add Email Account and choose Gmail from the list.
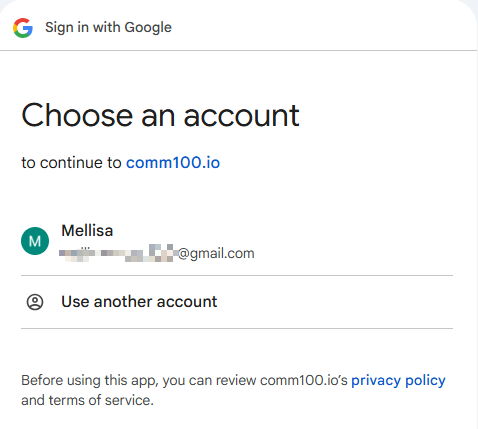
- Choose an existing Gmail account you are logged into, or click Use another account to sign in with a different one.
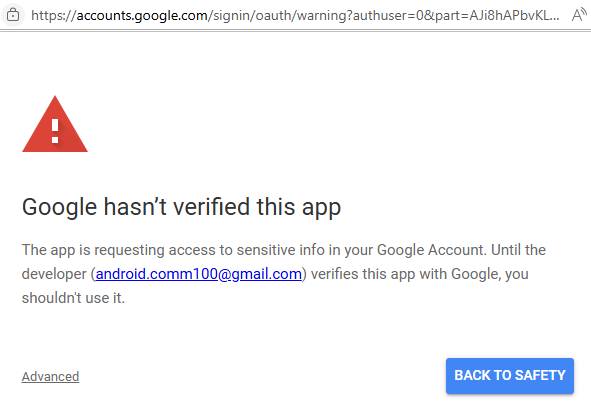
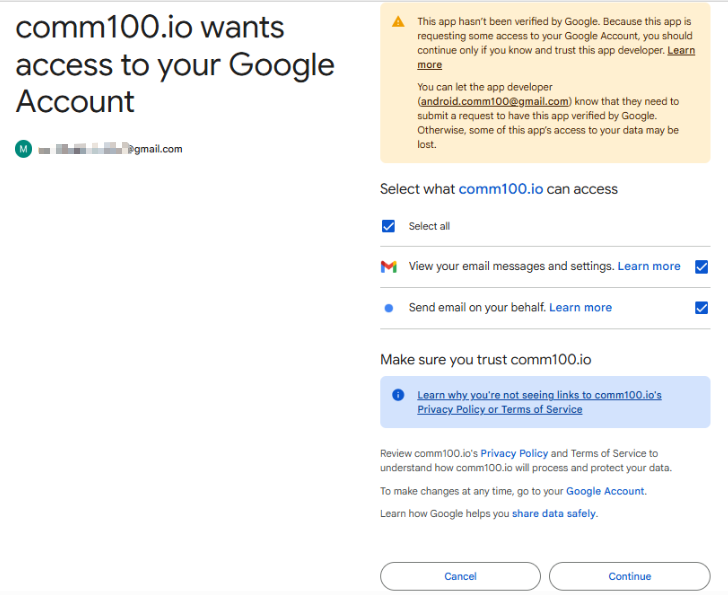
- You may see a page that says "Google hasn't verified this app" page, as our app is still under Google's review. The review process may take some time, but during this period, account connection and integration functions will continue to work normally.
- Click Advanced, then select Go to comm100.io (unsafe).
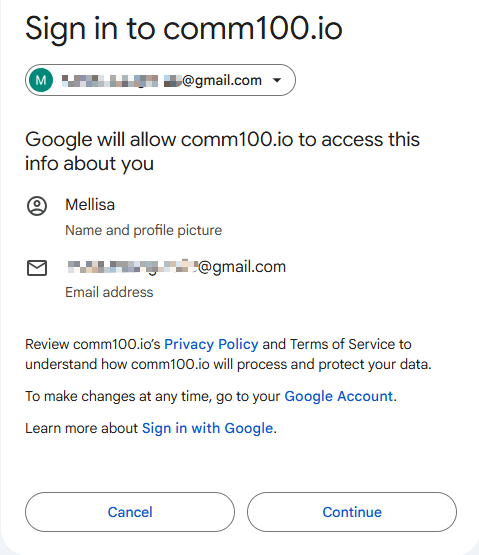
- On the Sign in to comm100.io page, click Continue.
- On the permission page, choose Select all to grant Comm100 access to view your email messages and settings, and also send email on your behalf. Then click Continue.
Your Gmail account is now added to Comm100 successfully. The added account appears in the email account list.
- Log in to your Comm100 Control Panel.
- From the left navigation menu, go to Ticketing & Messaging > Channels > Email.
- Click Add Email Account and choose Microsoft Exchange from the drop-down list.
- Enter your Email account information.
User Info- Your business email address: Input the address of the email account that you want to add.
- Password: Input the password of your email account. If you enabled two-step verification and generated an app password, use the app password here.
- Your name: Input the name you want your recipients to see. For example, Comm100 Customer Support.
Server Info- User name: It might be the part of your email address before the @ symbol or your complete email address.
- Exchange web server URL: Input your Exchange server URL. A typical Exchange Web Server URL looks like: http://mail.yourdomain.com/ews/exchange.asmx
- Click Test to verify your account information.Note: If the test status is “Failed”, edit your entries according to the error message that appears and try again.
- Click Save.
Your Exchange account is now added to Comm100. The added account appears in the email account list.

- Log in to your Comm100 Control Panel.
- From the left navigation menu, go to Ticketing & Messaging > Channels > Email.
- Click Add Email Account and choose POP3 from the drop-down list.
- Enter your Email account information.
User Info- Your business email address: Input the address of the email account that you want to add.
- Password: Input the password of your email account.
- Your name: Input the name you want your recipients to see. For example, Comm100 Customer Support.
Server Info- User name: It might be the part of your email address before the @ symbol or your complete email address.Note: If you are using a corporate Gmail account, add "recent:" before your user name to ensure normal communication. For example, recent:yourname@example.com
- Incoming mail server (POP3): The incoming mail server information. Check with your ESP or mail administrator for the server address.
- Outgoing mail server (SMTP): The outgoing mail server information. Check with your ESP or mail administrator for the server address.Note: The sending limits, such as the number of emails sent per day and the number of recipients per email, are subjected to your SMTP server.
- Click Test to verify your account information.Note: If the test status is “Failed”, edit your entries according to the error message that appears and try again.
- Click Save.
Your POP3 account is now added to Comm100. The added account appears in the email account list.

- Log in to your Comm100 Control Panel.
- From the left navigation menu, go to Ticketing & Messaging > Channels > Email.
- Click Add Email Account and choose Shared Mailbox from the drop-down list.
- On the subsequent page:
- Enter your business mail address.
- Enter the shared email address. Note: Ensure that your business email address and shared email address are distinct.
- Click Continue.
A permission request window appears.
- In the Permissions requested window, click Accept to grant permissions to Comm100.
Your Office 365 Shared Mailbox account is added to Comm100 after the permissions are granted successfully. The added account appears in the email account list.


If an account status is Failed, you can view the cause of the failure by hovering over the status or going to the account details page. When the connection fails due to an authorization error, you can edit and reconnect on the account details page.
- For a POP3 or an Exchange account, edit your account information, such as username or password.
- For an Office 365 account, click Reauthorize.
- For an Office 365 Shared Mailbox account, click Reauthorize.


Some businesses want to track their external transaction or notification engagements to their customers in Comm100 Ticketing & Messaging. They typically use a third-party system, which can send out an email notification for every status update. Such email notifications are currently treated as separate tickets in Comm100 Ticketing & Messaging.
With the Custom Ticket Identity rule on the Comm100 Ticketing & Messaging Email channel, your agents now have the option to keep a track of a status update notification for a particular transaction as a single ticket.
Step by Step Instructions
To configure the Custom Ticket Identity rule, follow these steps:
- Log in to your Comm100 Control Panel.
- From the left navigation menu, go to Ticketing & Messaging > Channels > Email.
- Create an email account.
The added account appears in the email account list. - Click an account name or the Edit icon from the email account list.
- To set up email grouping, scroll down and expand the Advanced section.
- Select the Custom ticket identity rule check box.
- From the Match the content from drop-down list, select the email area to define a regular expression for the ticket identifier string. That is, Subject or Body.
With a unique identifier defined properly, all emails with the same unique identifier would be tracked and merged for review. - Define a regular expression or a string pattern, which Comm100 matches against the body or subject of the email. All the incoming emails matching the regular expression or a string pattern are grouped into one ticket. To learn more about Regular Expression, see this article.
- Click Save.


In case you want to set up Custom Ticket Identity Rule for your Email channel, contact your Account Manager or Comm100 Support.
Key Notes
Once your Custom Ticket Identity rule is set up and implemented, you may come across the following scenarios while using it:
Whenever an agent replies to a ticket with multiple subjects, a reply from the Agent Console will use the ticket title.
Consider a scenario where you have set a regular expression: order-[0-9]+
And that the customer sends the first email with the following subject: What is the update on order-123456. Against this email, a ticket is generated in Agent Console with id 100.
Later, another email with the following subject: Follow-up update for the order-123456 is received. Against this email, a message is created and grouped with the same ticket id 100.
When an agent replies to the client's email from the Agent Console, an outgoing email is sent having the ticket subject: What is the update on order-123456 (of the first sender).
Whenever an agent replies to a ticket having multiple senders, the outgoing email addresses the sender of the first email (Contact) in the To: list and the sender of the last email in the CC: list
Consider that an agent receives an email from the first sender: divxxxxx6@gmail.com. Later, the agent receives another email from the second sender: shikxxxxxari@gmail.com. Both emails are grouped based on the regular expression and ticket id.
When an agent replies to the ticket, the first sender: divxxxxx6@gmail.com, is always addressed in the To: list, and the latter one: shikxxxxxari@gmail.com, is addressed in the CC: list of the outgoing email.

Now, consider that an agent receives an email from the third sender: divxxxxxra@comm100.com. Their email is grouped based on the regular expression and ticket id.
When an agent replies to the ticket, the first sender: divxxxxx6@gmail.com, is always addressed in the To: list, and the latter one: divxxxxxra@comm100.com, is addressed in the CC: list of the outgoing email.

- Default email account: The default email account is used as the default sender for tickets converted from live chats, offline messages, or the manually created new tickets from the Agent Console.
- Create a new ticket when contacts reply to resolved tickets: With the checkbox selected, a new ticket is created when the contact replies to a resolved ticket. The new tickets are assigned to agents based on the triggers, routing rules, and auto distributions rules as applied to other new tickets. With the checkbox cleared, the contact's reply is attached to the resolved ticket and the ticket is reopened automatically.
- Remove "Powered by Comm100" in emails: With the checkbox selected, the Powered by Comm100 link does not display in the email reply.
